The post Data flow in an analytics platform: How to set up your data collection and analysis process appeared first on Piwik PRO.
]]>Data can stream in different directions and back and forth between systems. It may take a lot of work to figure out how data moves around, how it’s transformed at every stage, and what ways your company can benefit from these processes. If you collect personal information, things become even trickier because you need to ensure privacy and security levels at all times.
In today’s post, we’ll walk you through the ins and outs of a data flow based on an example in Piwik PRO. You’ll see that even with consent collection and management, there are simple ways to design and describe data flow.
pro tip
We’re presenting the most popular setups of analytics platforms. There are many ways you can configure Piwik PRO to adhere to local data protection guidelines. For more details, review our help center article on how you can collect data in a privacy-friendly way.
A basic data flow
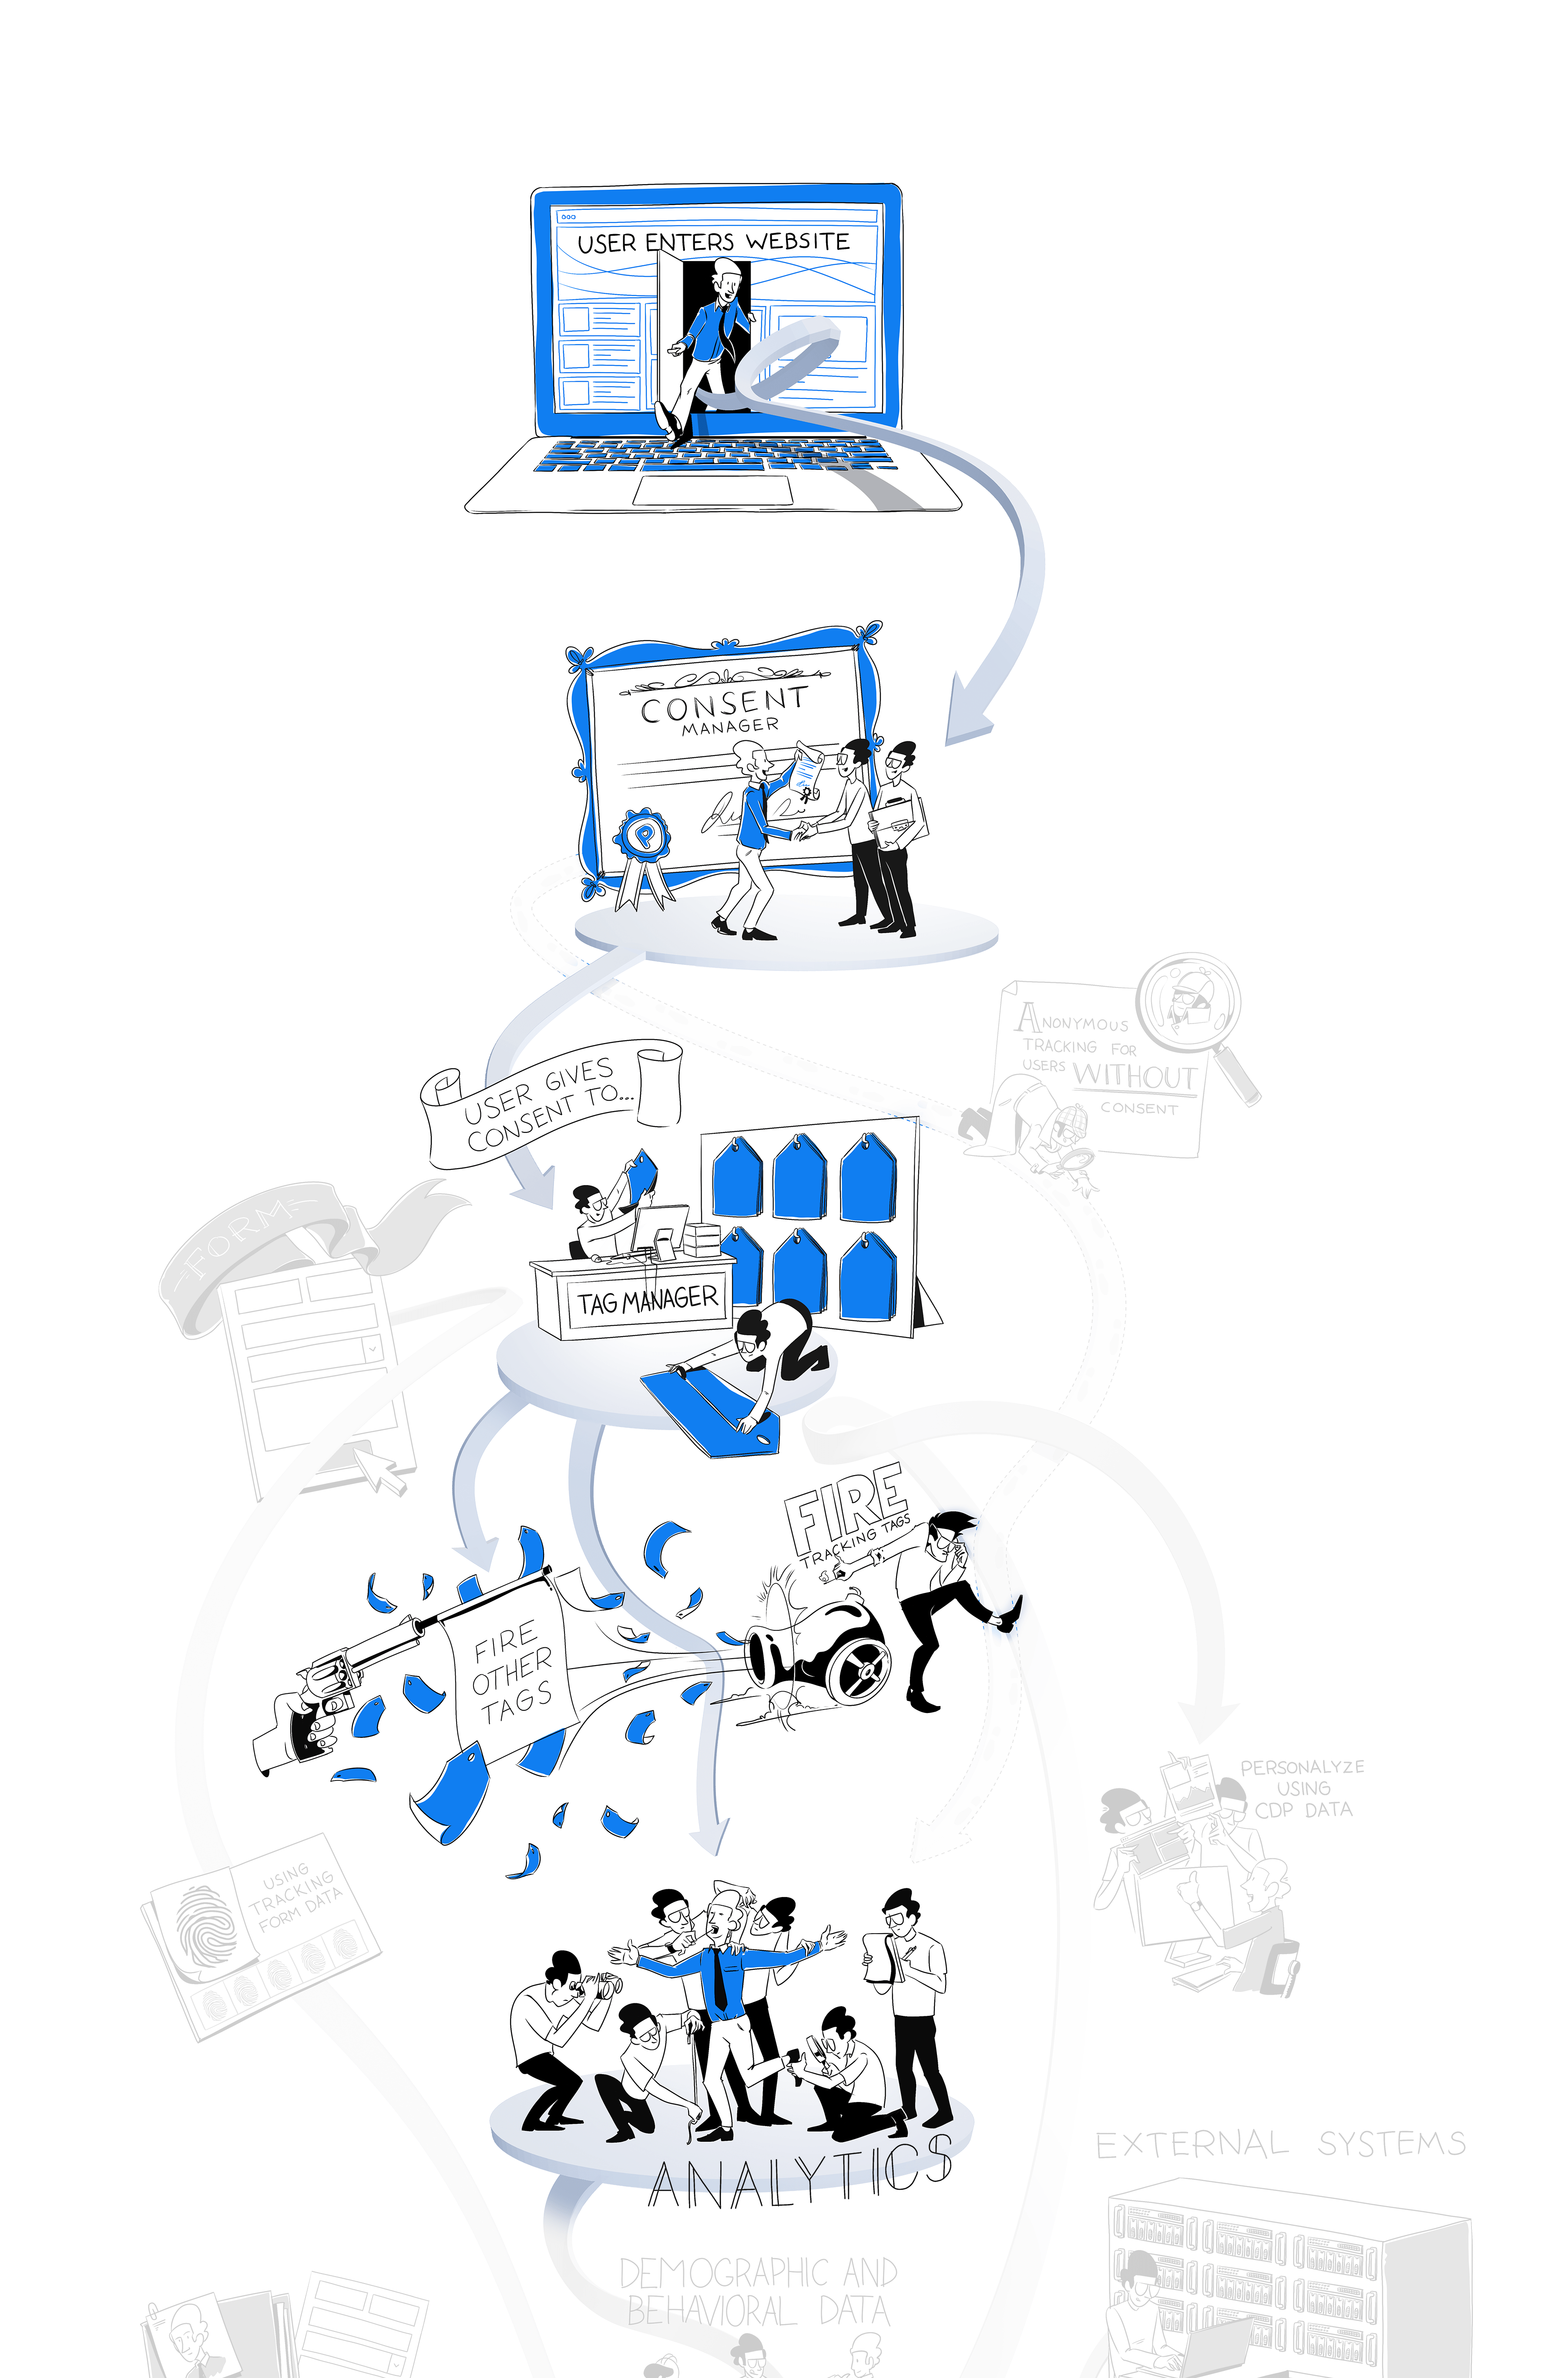
In most cases, the first step in a data flow is asking the visitor for consent to collect their data. If they grant consent, you gather their personal information and use it in your analysis. However, if the user declines consent or ignores the consent banner, at most, you will be able to collect and use anonymous data.
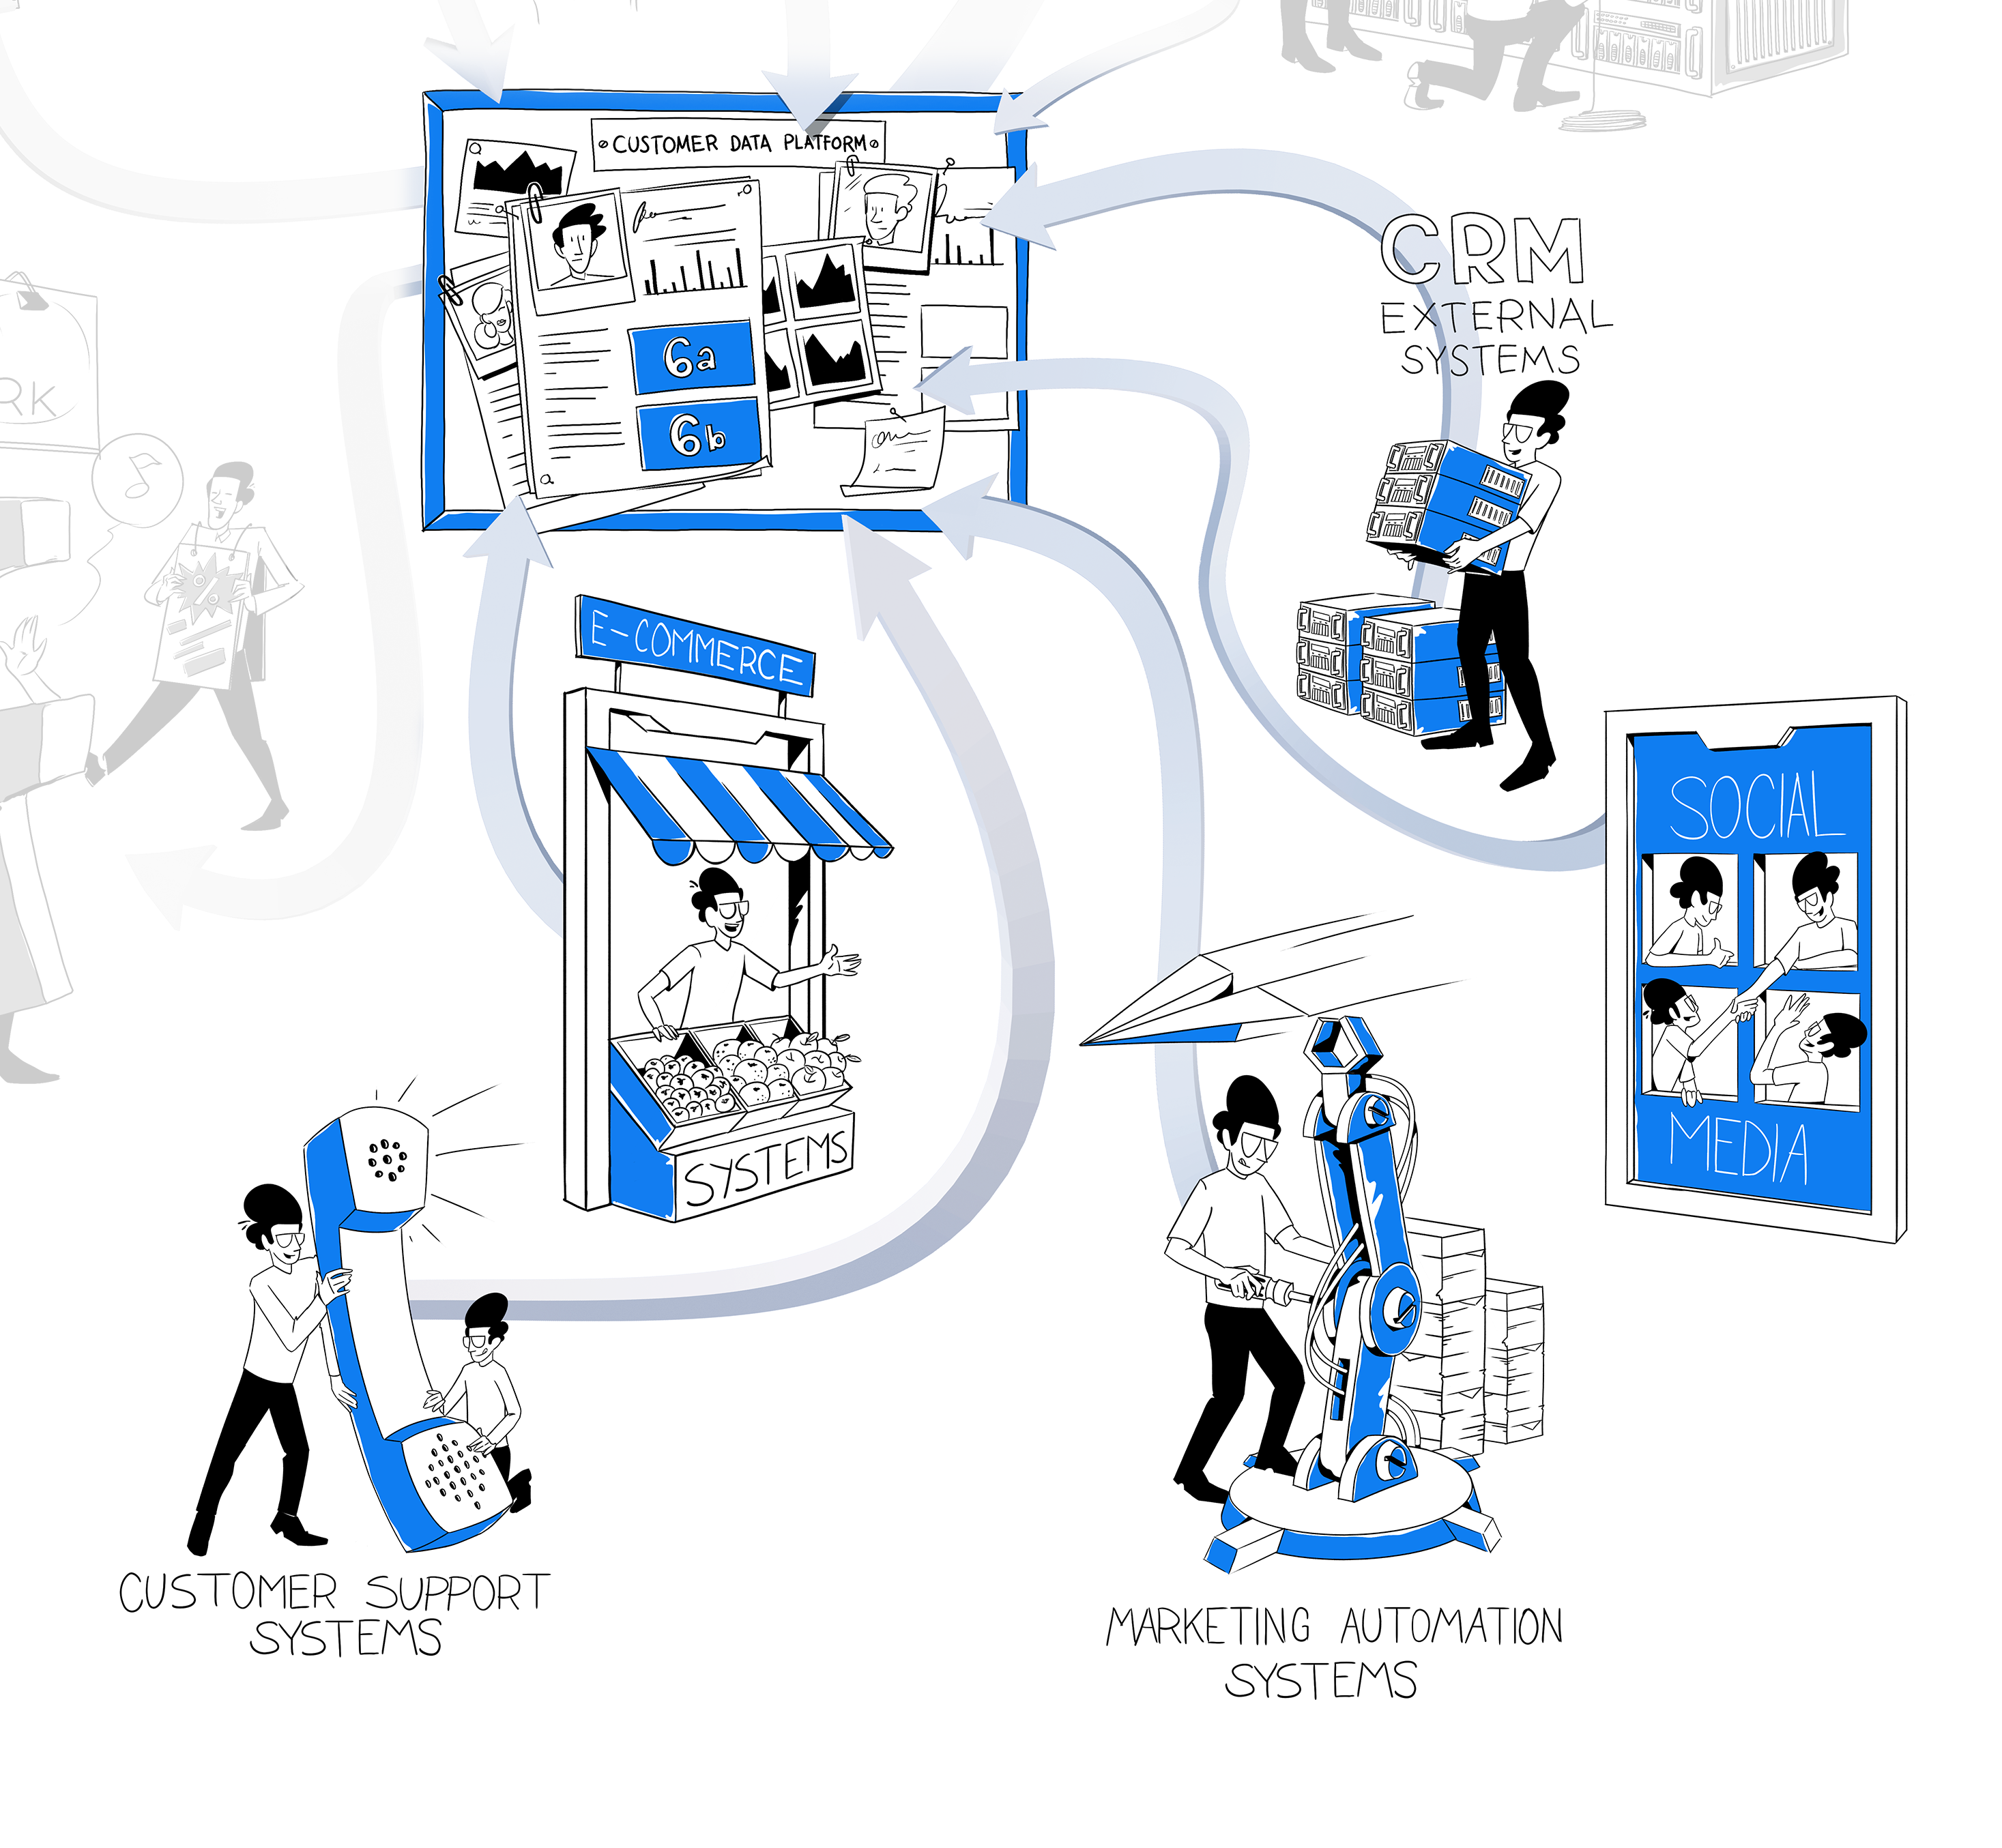
After this is settled, you should proceed with analyzing the data. For that purpose, you use the web or app data and import data from other sources, such as a CRM or marketing automation platform. You can also export data to other tools or platforms for further analysis or visualization.
Data flow step-by-step
Data analytics flow depends on consent, which sets the direction of the whole process.
Let’s look into a scenario in healthcare. Imagine a user visits your website, mygoodhealth.com. After they enter the site, they are served with a consent form.
Use a system like Piwik PRO Consent Manager to facilitate the process of collecting consents from users. It will save user decisions and send the information about them to the rest of the analytics platform.
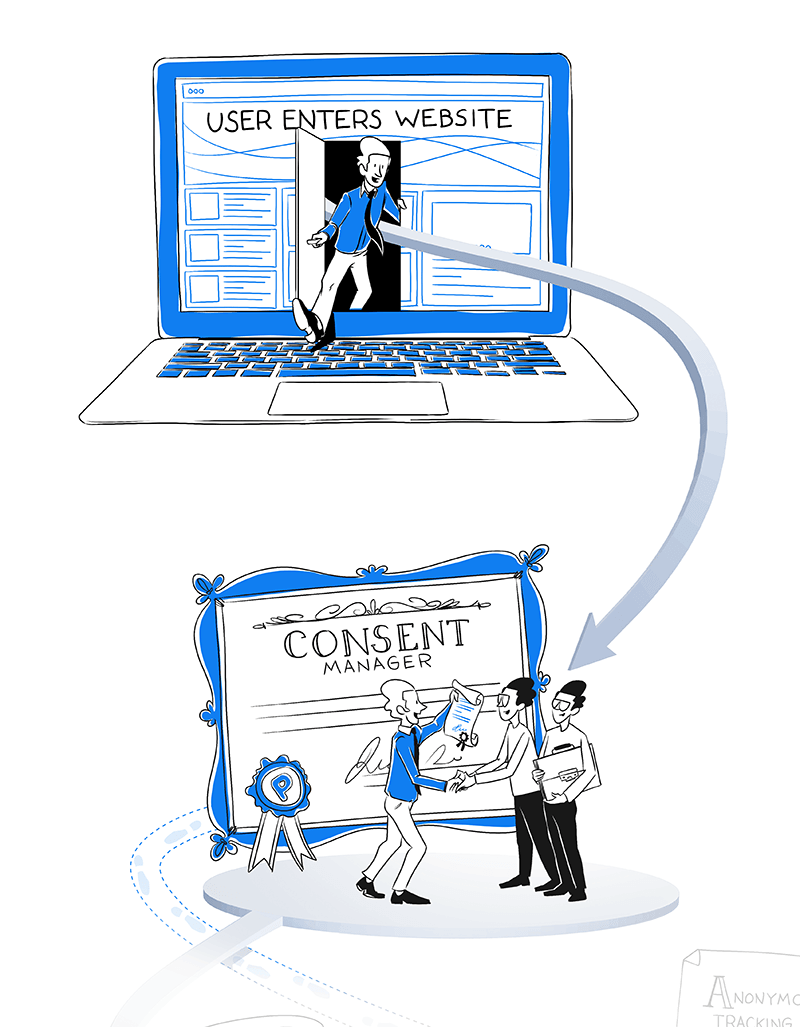
Users decide if they agree, don’t agree, or partially agree to the processing of their data, or they ignore the consent prompt and browse the website without making a decision.
Now is a good time to introduce two more modules of Piwik PRO Analytics Suite and explain their role in the data collection process:
- Analytics – Gathers both personal and anonymous data depending on the received consent. You can set the parameters for the tracker so it collects data in a way that matches your privacy and security requirements.
- Tag Manager – Manages tags – all those little pieces of code that fire based on conditions you define, often sending data to Analytics. If a user consents, tags are fired. Without consent, you still collect anonymous data with the Analytics module but without tags.
Tags won’t fire without user consent – this constitutes a so-called zero-cookie load. As a result, no user can be tracked by default. This setup allows for compliance with strict regulations, such as GDPR and local European guidelines, like those outlined by the French CNIL.
New laws that impose similar restrictions appear all the time, like the California Consumer Privacy Act (CCPA) in the US and the Personal Information Protection and Electronic Documents Act (PIPEDA) in Canada.
Whether a visitor agrees or not, you still get valuable insights, but the process will look different. Let’s analyze the possible scenarios.
A user doesn’t consent or ignores the banner
When a user doesn’t consent or ignores the consent banner, you can activate anonymous data tracking and collect some data using the Analytics module.
There are a few options available in Piwik PRO for when you don’t get user consent. They differ based on the technology used for data collection.
Here are the methods:
- Collect data using a 30-minute cookie: This method uses a first-party session cookie to collect data. After 30 minutes, the cookie is removed from the browser. The major advantage of this approach is that there are no duplicate sessions. This is also the most reliable anonymous data collection method.
- Collect data without cookies: This method uses a session fingerprint deployed on the device. The analytics platform won’t create or store any cookies in visitors’ browsers. The major advantage of this method is that it’s permissible under several regulations, such as the German TTDSG/TDDDG. The downside is that it creates duplicate sessions, which results in less accurate data. Both of the options mentioned so far let you capture all the traffic, as well as session and event metrics. The tracker collects the information and binds it into a session of a non-returning visitor. Visitor metrics will only be collected after a user consents. There is also a third option…
- Don’t collect data: The tracking code won’t be fired for visitors. If you disable tracking completely, there won’t be a trace of data about visitors that don’t consent to data collection. You won’t even see a page view for that user.
Naturally, anonymous tracking has limitations. It won’t let you collect and store personal data unless you have explicit consent. You also won’t be able to recognize new and returning visitors or identify visitors across sessions. Anonymous tracking will only work if browser fingerprinting is deactivated and geolocation is based on anonymized IP addresses or is deactivated.
If you’d like more details on what data you can collect anonymously, we recommend reading our post on anonymous tracking: how to do useful analytics without personal data.
A user gives consent
You have more opportunities if you receive explicit consent from users.
When a user gives their consent, you can use their information for different purposes depending on what they agree to. These include analytics, A/B testing and personalization, marketing automation and remarketing.
Once consent is registered, Tag Manager fires an analytics tracker. As the visitor interacts with your site, the Analytics module jumps into action by gathering basic information about the visitor’s:
- Device
- Operating system
- Browser name
- Browser language
- Country
It also gathers information about the content the visitor interacts with, such as:
- Pages viewed
- Videos played
- Forms filled
- Files downloaded
- Clicks on elements of the website or app
- Impressions of content
Making more out of data with a CDP
Collecting user data is not the end of the process.
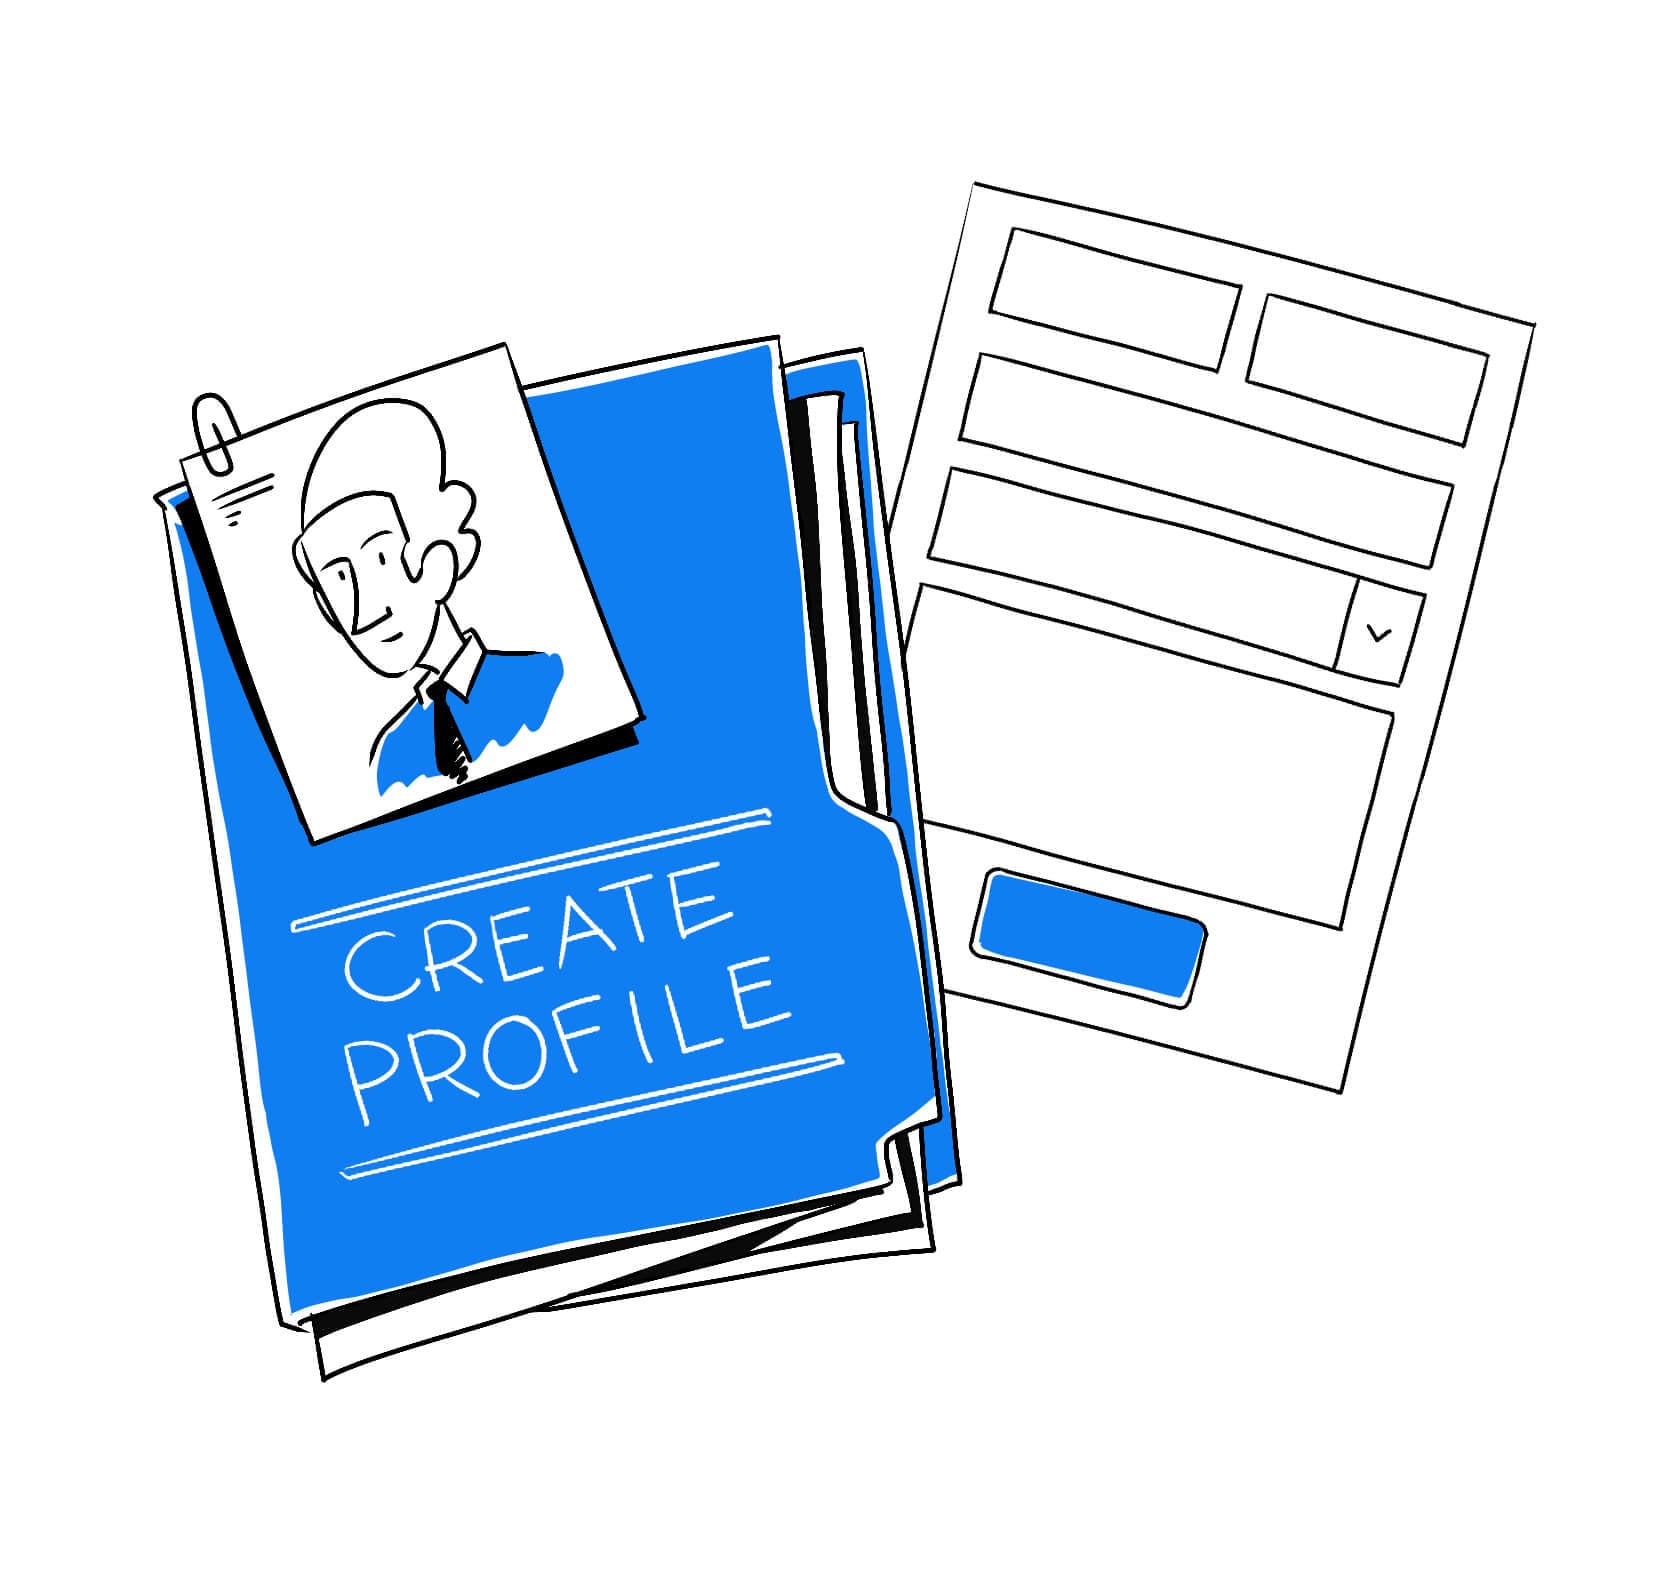
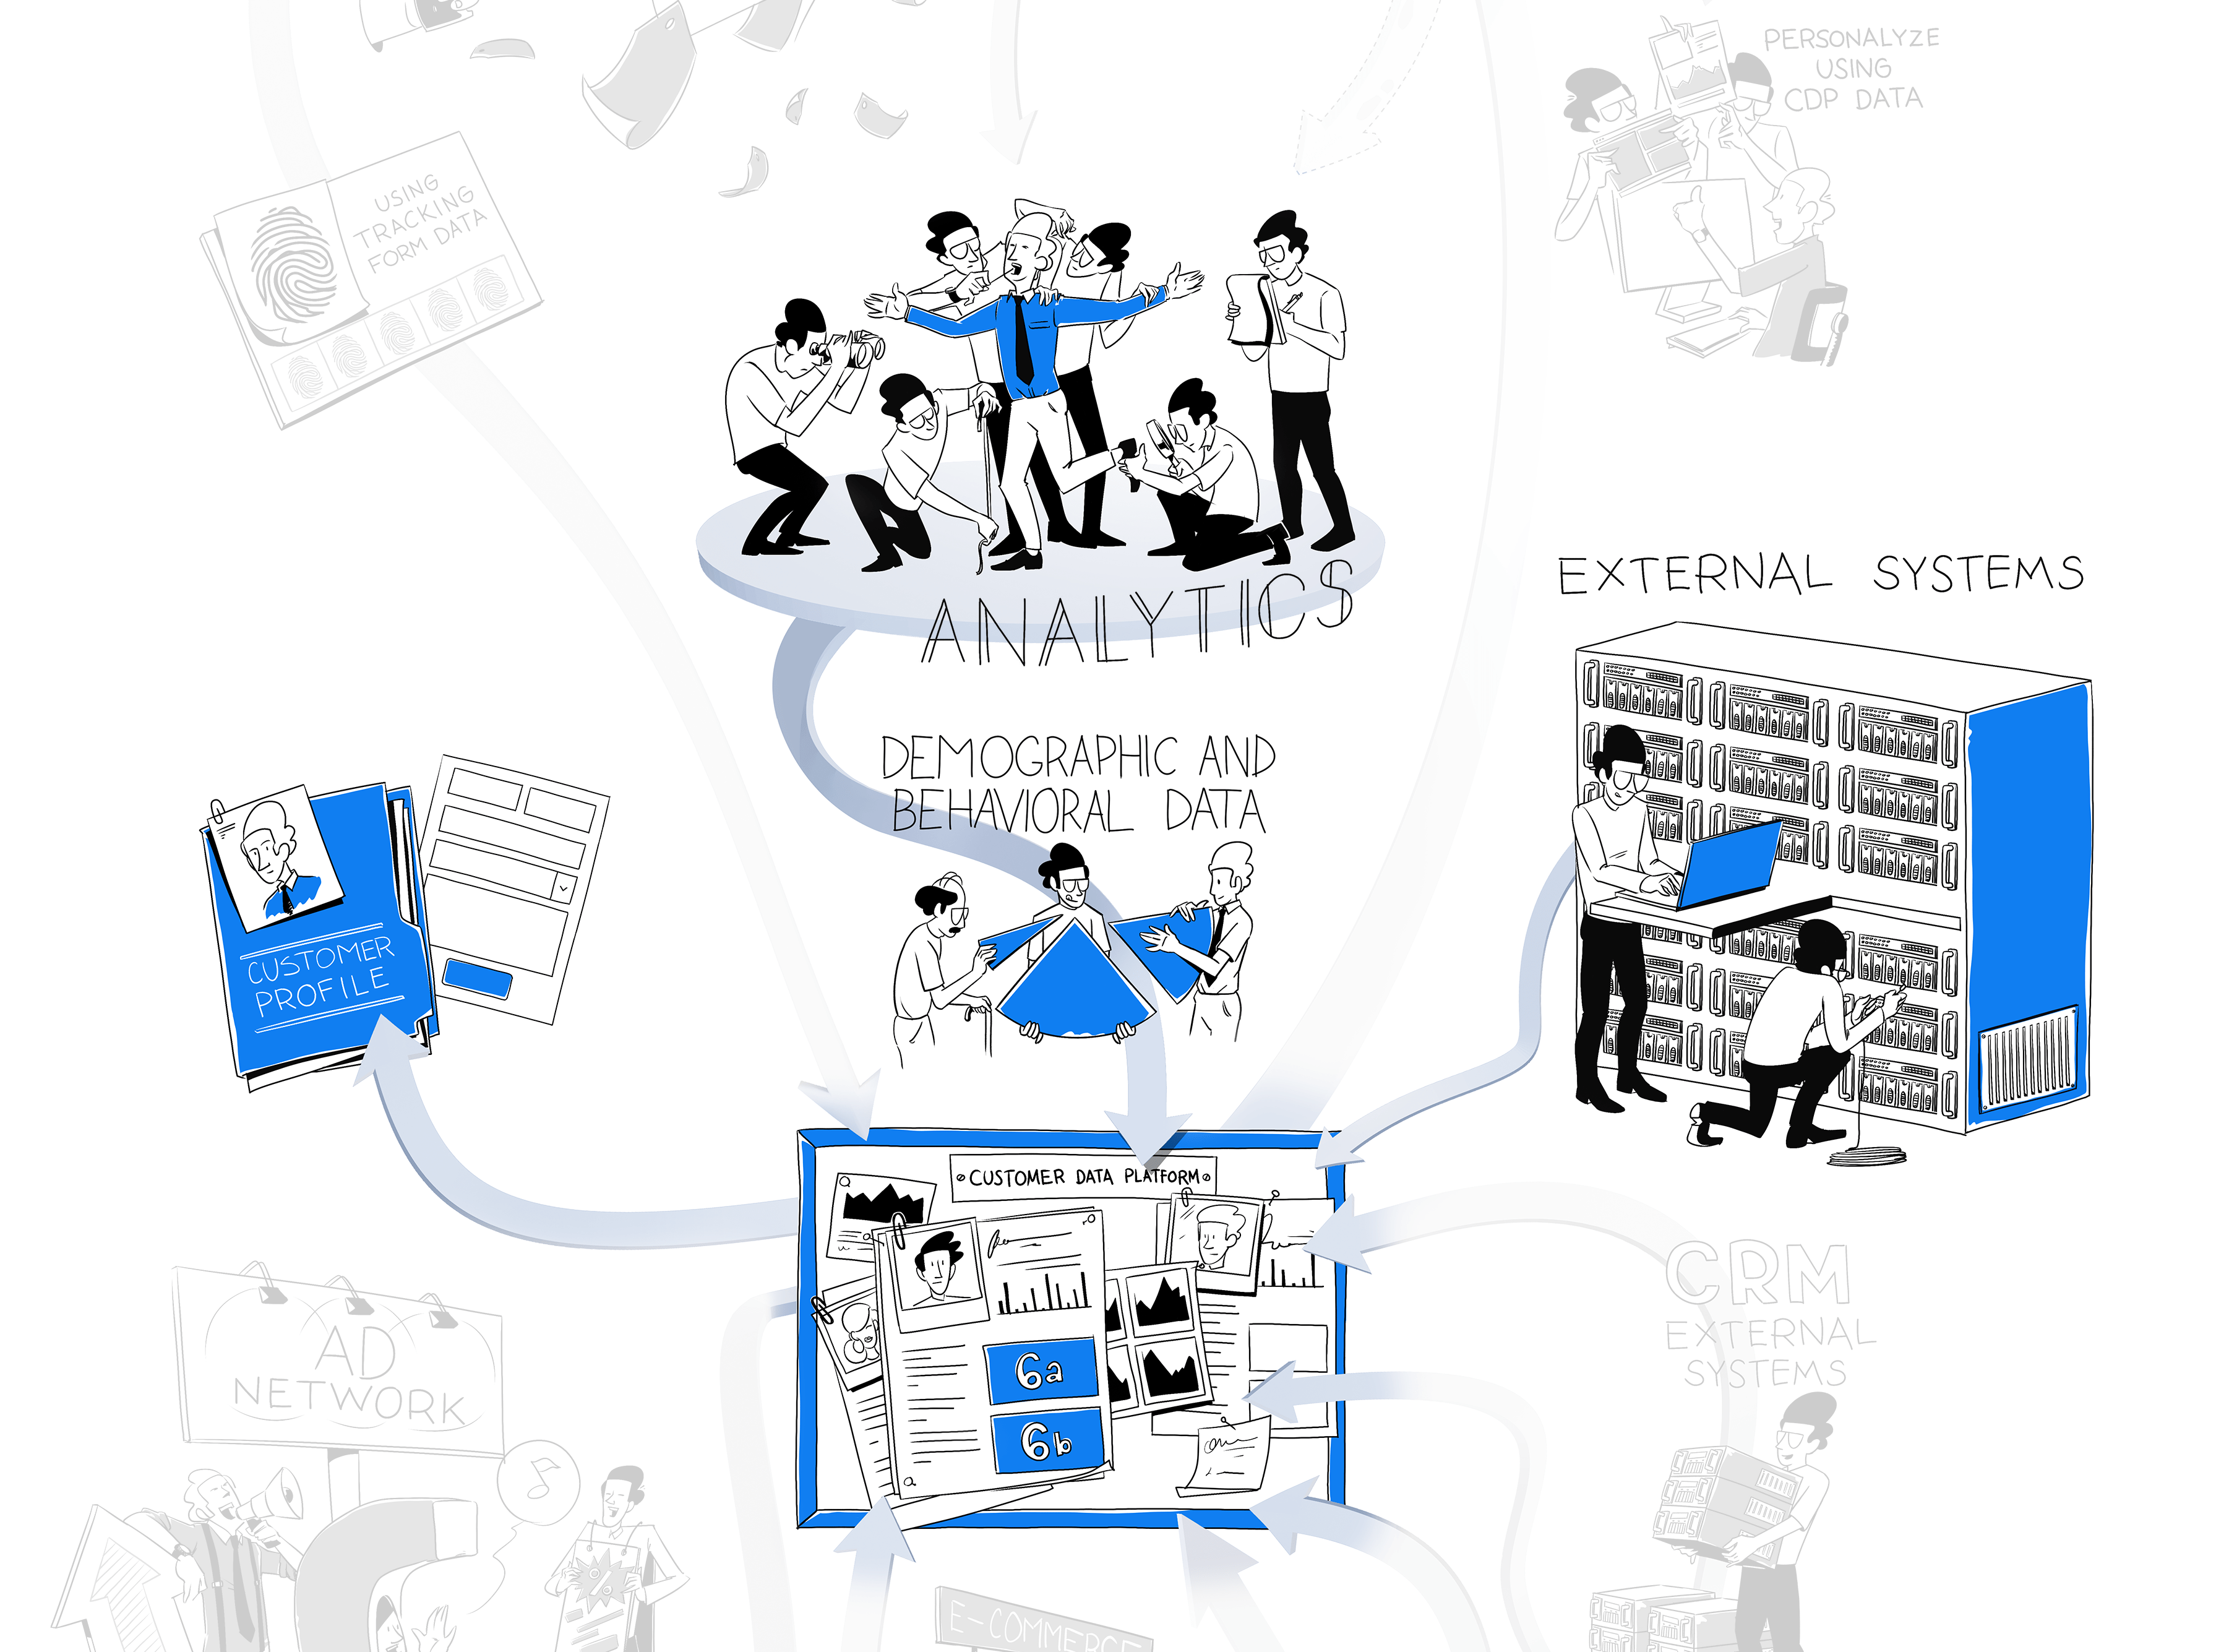
Your web and app analytics data can be integrated along with data from other sources using Customer Data Platform (CDP), the final module of Piwik PRO Analytics Suite.
CDP helps you connect data scattered across different systems into complete customer profiles that map all user characteristics and behaviors.
Your visitor may browse through your site mygoodhealth.com, click on Information for patients, Our facilities, and finally, Specializations. From that page, they can navigate to Contact and fill out the form where they share their name, email address and phone number.
All this behavioral data – visited pages, completed events, clicks, scroll percentages, filled out forms – as well as other acquired information, such as demographics, order history, consent records, sales interactions, data from other sources, and more, will appear in the single customer views. You can enrich user profiles with custom attributes – such as personas that specific users represent or support tickets they’ve created – by integrating CDP with other tools using webhooks and automation tools.
As the user returns to your website or app, performs more actions and lets you collect more data, their profiles will expand over time.
Combining all these sources helps you speed up specific processes as you fill in gaps in the customer journey. With more data at your fingertips, you can better adjust your products and services to the needs of your visitors.
An essential aspect of creating user profiles is deterministic identity resolution, which consists of comparing and matching first-party identifiers such as email addresses, login data, device ID, cookie ID, to recognize that pieces of information refer to the same customer.
To learn more about how customer profiles are built and ways to use them in a CDP, check out our blog post: Single customer view (SCV): what is it and how does it work?
Unified customer profiles come with many new opportunities.
You can trigger personalized marketing campaigns based on customer activity and demographics.
Piwik PRO’s CDP allows you to segment audiences based on user attributes such as source, country, first visited URL or total revenue. Customer attributes are collected by the CDP automatically from analytics events and are matched with the given user’s profile through first-party identifiers.
You can also create audiences with behavioral conditions according to the frequency of events over time. For example, you can create an audience of people who visited a page “store” 3 times in the last 7 days.
If you plan and set up your audiences correctly, you end up with highly specific user segments that allow you to better target clients and visitors and help them convert.
Read our article on Audience targeting: how to successfully use a CDP to find out how you can segment users to improve the effectiveness of your audience targeting efforts.
Once your data is assembled into profiles and segmented, you can easily put it into action in other systems and platforms.
The Piwik PRO CDP lets you send selected attributes to numerous destinations through webhooks and automation tools, such as ad platforms, email marketing tools, CRM and others. Activation sends the customer profile attributes to the webhook’s endpoint. The webhook is triggered when the customer profile becomes a member of the audience.
Keep data protection regulations like the GDPR in mind. Privacy laws are updated frequently, so teams should stay on top to ensure they are gathering, processing, and storing data in a compliant way. Make sure the data you connect from other tools is collected with explicit consent where applicable.
Apart from using the available tools, you have the option to create custom activations and define more advanced integrations.
To get more detailed knowledge on the possibilities of data activation, read our blog post on What is data activation and how does it fit into your data analytics stack.
By combining Tag Manager, Analytics and Customer Data Platform, you create a core pipeline of data flow in which the modules complement one another.
We’ve shown you just a fraction of what you can achieve, but there are endless opportunities to track the right data, get it from selected sources and activate it in other places.
We’ll discuss some of those options in the following sections.
Get more data flowing through your stack
You already have some idea about how Tag Manager signals to Analytics what data to collect, then sends it for segmentation and activation in CDP. These modules work as a trio, collecting and exchanging information as users interact with your website.
Every time a returning visitor engages with your site or uses your app, their CDP profile will keep updating to become richer and more complete. But you should also expand the volume and improve the quality of the data you add to your system by connecting more sources to your CDP.
With Piwik PRO, you get the flexibility to set up your data flow in a way that protects the security of users’ personal data. You can integrate sensitive data and choose one of our safe hosting options. Piwik PRO also holds ISO-27001 and SOC 2 certifications.
You have complete control of your data as Piwik PRO doesn’t share it with any third parties, which is crucial in sectors such as healthcare, finance and government.
Learn more about our approach to data protection and HIPAA compliance here:
Let’s get back to our mygoodhealth.com example. It’s a medical website where people find and book appointments with specialists at different facilities, read articles explaining medical conditions and symptoms, and receive personalized health tips after providing some information about themselves.
Users can also pay for a premium service to get priority access to online and in-person consultations, on-demand medical advice through the phone, and unlimited access to articles and guides. Apart from the website, there is a mobile app where users easily log into their accounts and browse the platform’s features.
With Piwik PRO, you’ll get valuable data about how and when customers use the website and app. You see which of your offerings they are most interested in, what topics they read about most often, and what services they have already used.
You’ll be able to measure the average rating of appointments and video consultations. By looking at ratings of recent appointments correlated with other factors, you can identify possible reasons for churn and customer dissatisfaction. Tracking the last appointment date makes it easy to decide when to ask for feedback via a survey.
You can gather detailed information on the user experience on the site and in the mobile app, such as:
- Time spent on different parts of the service
- Clicks on links and buttons
- Most visited pages
- The adoption rate for new features
- The popularity of specific articles and videos
After analyzing this data, you can present specific recommendations to product designers.
Having this penetrating insight means you’ll be able to connect information about users to how visitors behave on the service and how they renew and cancel memberships. Those connections help you infer what visitor activities lead to higher satisfaction and membership renewals.
Putting the data into action
Piwik PRO allows you to trigger actions based on the CDP audience segments we’ve already mentioned.
You can pick one of the created audiences and tailor your activities – for example, showing an ad, displaying personalized content, sending an email campaign – to your targeted segment. You can activate your audiences with a CDP by sending them to various tools and platforms. It’s up to you what exact user attributes you want to base your campaigns on.
In Piwik PRO, you can use countless integrations and transfer data to numerous destinations like Hubspot, Mailchimp, Slack, Zendesk, Twilio, LinkedIn, Facebook Ads, Google Ads, Zapier, and many more. You can also trigger tags for remarketing ads, A/B testing, on-site retargeting, personalization, and other tools in real-time.

For example, you can segment existing customers who haven’t filled out a survey but have scheduled and completed an online or in-person consultation in the last 14 days. You can then email them a survey to get feedback on their consultation.
Or, you can create an audience of customers who have used your services before – for example, completed three consultations with the same specialist in the last 12 months. You can show them an ad banner with a complementary offer, such as a discount for another consultation.
Or, let’s take an audience of clients that paid for the premium service but haven’t visited your site or app or used your services in the past 6 months. You can serve them branding ads talking about the benefits of your platform and presenting its features.
Activating your audience on ad networks
You can also use the information you have to enhance your marketing outside the Piwik PRO ecosystem. One such option would be activating your CDP audience on Facebook Ads, Google Ads or other ad networks.

CDP recreates your audience in Google Ads or Facebook Ads but only using the data these two platforms already have. The data you have in Piwik PRO will not be exported or copied to these tools in any way during audience activation. The process is essentially an audience approximation in external ad networks.
You still benefit from targeting your CDP audiences and running personalization campaigns on external platforms while maintaining high data privacy and security standards.
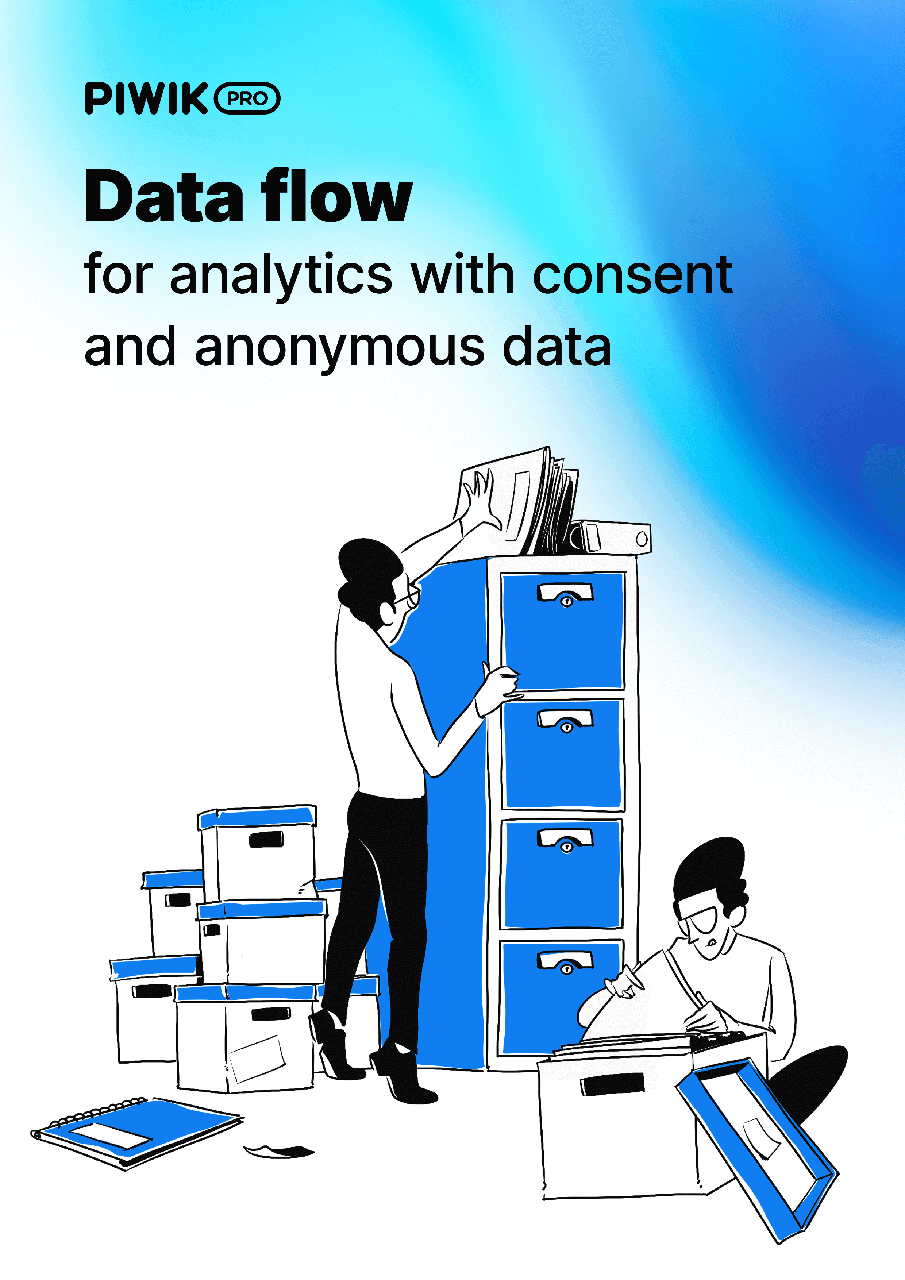
Infographic
Data flow for analytics with consent and anonymous data
Learn how your data pipes are connected to ensure that data stays safe and private
The benefits of understanding how data flows
Analytics users often focus exclusively on deciding what data to gather, interpreting it, and making strategic decisions based on the results. These are all good things to think about, but you should still understand how your data pipes are connected to use the gathered data to the full extent of its capabilities.
Understanding data flows empowers you to make new connections with the help of complex platforms like Piwik PRO Analytics Suite. You can do so while ensuring the data stays safe and private throughout the process.
- 6 ways analytics software collects data online – plus a comparison of 5 popular platforms
- How Analytics & Customer Data Platform Can Help You Track the Full Customer Journey
- What is privacy-friendly analytics?
If you have any questions about the data analytics process or the features of Piwik PRO’s modules, reach out to us! Our team will be happy to address any questions.
The post Data flow in an analytics platform: How to set up your data collection and analysis process appeared first on Piwik PRO.
]]>The post 70-point comparison of 7 tag managers appeared first on Piwik PRO.
]]>Tag management solutions track marketing data by embedding tags in websites or apps. They are essential to capture information for web analytics. Digital marketers can use tag managers to track conversions and collect visitor behavior data without the help of developers.
Choosing a tag manager for your organization shouldn’t end with analyzing the extent of features and customization options. Due to the increase in the importance of data governance, your tag manager should also include data privacy and security features.
Learn more about Piwik PRO Tag Manager.
Why do you need a tag management system in the first place?
Tag managers simplify the process of web and mobile tracking for analysts and marketers. They are able to create, edit, and deploy tags in minutes using the available tag, trigger, and variable libraries. Teams get more power and flexibility.
The main benefits of using a tag manager include:
- Saving time and resources by reducing the workload of the IT team.
- The ability to consolidate and standardize the process of updating tags.
- Easily tracking and maintaining large numbers of tags.
- Faster page load times and better site performance.
- Making your marketing activities more efficient.
- Increased data accuracy.
- Being able to easily comply with privacy requirements.
read also
Comparison of 7 tag managers – 70 factors from tag types to privacy
Understand the differences between Piwik PRO Tag Manager, Google Tag Manager, Tealium IQ Tag Management, Segment, TagCommander, Matomo Tag Manager and Ensighten Manage
How to choose the right tag management system
To make your data collection more efficient and secure, you should look for a tag management system with the following characteristics:
Customer Support
Tag managers take care of a lot for you, but at the core, you’re still dealing with complex JavaScript code. It’s helpful if your tag manager has extensive documentation you can use for guidance. Ideally, the tool you choose should have a support team you can reach out to in case of any problems or unknown bugs.
Privacy compliance and data control
Make sure your tag management platform contains advanced privacy-friendly features that will support the collected data’s security and give you enhanced control over it. This can include features like zero-cookie load, safe hosting options, and choosing where your data is stored.
Integrations, libraries, and templates
Extensive libraries, templates, and integrations can save you a lot of time when creating, debugging, and maintaining your tags. Thanks to them, you don’t have to add too many custom tags yourself. Also, it pays to have an easy way to integrate your tag management system with tools such as consent manager or customer data platform.
Read more about how you can use tag managers in web analytics:
A review of tag management vendors
Piwik PRO Tag Manager
Piwik PRO Tag Manager lets you create, set up, debug, and run tags on your website to streamline data collection and activation without the help of developers. You can run online campaigns, integrate with Facebook Ads or Google Ads, and collect additional data. Use a vast library of tag templates, triggers, and variables, or create custom ones. With Piwik PRO, you can also count on complete data control and security – for example, connect Consent Manager to only fire tags with relevant consent.
Google Tag Manager
Google Tag Manager (GTM) is the most widely used tag management system and integrates well with Google’s other tools, such as Google Analytics 4 or Google Ads. GTM is a powerful tool for marketing and analytics teams that facilitates creating, embedding, and updating tags across websites and mobile apps. It offers features like debugging and rules, macros, or automated tag firing, allowing for data standardization and quick deployment.
With Piwik PRO you can use integration with Google Tag Manager to collect data server-side and client-side.
Segment
Segment is predominantly a customer data platform that shares some features and purposes with tag managers. The platform collects and structures the data to be integrated with analytics, advertising, email, marketing automation, CRM tools, and others with minimal effort. Segment can also archive the data, replay historical data into new tools, and send raw data to a data storage solution for later analysis.
Tealium IQ Tag Management
Tealium IQ Tag Management is a system for managing the configuration, testing, and release of third-party vendor tags to digital properties. The platform lets you unify disparate data sources and drive more consistent visitor interactions. Equipped with numerous vendor integrations, you can quickly deploy and manage vendor tags, test new technologies, and take control of your marketing technology stack.
Commanders Act TagCommander
Commanders Act TagCommander is an enterprise tag management solution that simplifies managing and deploying tags. This tool allows you to increase the quality of your implementation, collect data across devices, and use it across channels. Teams can explore unified audiences and send data to other systems for more precise segmentation, targeting, and personalization.
Matomo Tag Manager
Matomo Tag Manager lets you manage and unify all your tracking and marketing tags. You can quickly integrate various features into your site, such as analytics, conversion tracking, newsletter signups, exit pop-ups and surveys, and more. Measure the success of elements of your marketing campaigns and external channels. Matomo’s Tag Manager also makes sure that all snippets are implemented and loaded correctly for faster performance.
Ensighten Manage
Ensighten Manage, recently acquired by CHEQ, is an enterprise tag management solution that focuses on deploying, validating, and updating disparate marketing technologies while unifying customer data across brands, domains, mobile apps, and display advertising tags. All of this exists within a critical layer of security that ensures governance and data privacy. You can also use other Ensighten products, such as Ensighten Mobile, which lets organizations easily tag apps.
Overview of the analyzed features
We divided our comparison into the following sections:
Product overview
We prepared a quick overview of how each tag manager ranks in the most important categories: privacy and security compliance, product capabilities, customer care, hosting options, and customization possibilities. You can see each tool’s strengths and weaknesses and how they compare to each other.
Hosting
This part focuses on the available hosting options. Depending on your technical and legal requirements, cloud hosting may be sufficient, or you might need to choose a more secure solution, such as private cloud or on-premises hosting. It’s also great if your tag management system offers flexible data residency options so you can choose and know precisely where your customers’ data is being stored.
Privacy and compliance
Because tag managers support a range of tag types, they make it much easier to ensure compliance. See what privacy and security functionalities are offered in each tool. Go for a TMS that lets you keep full control over your data and how the tags are used.
Some features we are comparing here include zero-cookie load, firing tags based on the user’s consent, Opt-out or Do Not Track options at the individual tag level, and different privacy modes for session and event tracking.
Integrations
Learn whether the tag managers offer any other modules that can be easily integrated with your system.
A customer data platform adds a ton of value to tag managers. It enables granular, cross-platform data collection, protection of data quality and identity resolution, integration and activation, audience segmentation, and data governance and security.
A consent manager is useful for achieving compliance, especially when managing consents. You can keep track of users’ consent choices and apply them so your tags get fired only after consent is received.
Another crucial aspect is how flexible the TMS is regarding custom integrations and development. Find out if you can add and connect custom integrations to your tool.
Customer support
You should be able to contact customer support for help or onboarding assistance in the way that suits you best. Ensuring your tag management setup works correctly and serves your organization right is essential.
If your company has a simple setup or an internal tech team capable of creating and maintaining your tags, you may do with email or live chat support or access to a help center.
More elaborate tag setups might call for specialized help, such as a dedicated support specialist, personalized implementation, and onboarding or product training.
General tagging features
Various tag features can simplify the process of working with your tag manager. See what the tools offer in terms of tag import and export capabilities, folders for tags, triggers and variables, workspaces for concurrent tagging projects, and changelogs. Other analyzed features include access to API, moderation queue, server-side tagging, test and debug mode, and more.
Tag types
Here we look into the available tag types based on their purposes, as well as tag templates for analytics, remarketing pixels, or A/B testing tools and the option for using tag template libraries. Learn about support for asynchronous and synchronous tags, the ability to add custom tags, pop-ups, and tag templates, content personalization from within the tag manager, and others.
Trigger types
Moving on to triggers, we analyze the options of libraries of triggers and conditions, trigger groups, event trigger templates, and other types of trigger templates. Learn whether the tools include trigger types such as data layer, page view, history change, exit intent, or form submission.
Variable types
In this section, we explore the available types of variables – custom JavaScript, cookie, data layer, DOM element, URL, constant or random number variables, as well as access to built-in variable templates.
Flexibility and limits
Here you can learn if there are any limits to how many tags, custom variables, and user roles and permissions you can add. You can also check whether the tools support two-factor authentication.
Preview of our tag management comparison
Note: We’ve shortened some product names for easier reading. Here are the full names of the products covered:
- Piwik PRO Tag Manager
- Google Tag Manager (360-only features are noted in the table)
- Segment (with Business plan features)
- Tealium IQ Tag Management
- Commanders Act TagCommander
- Matomo Tag Manager
- Ensighten Manage
Product overview
| Piwik PRO | Segment | Tealium | Tag Commander | Matomo | Ensighten Manage | ||
|---|---|---|---|---|---|---|---|
| Privacy and security compliance | |||||||
| Product capabilities | |||||||
| Customer care | |||||||
| Hosting options | |||||||
| Customization |
Hosting
| On-premises | |||||||
| Cloud | |||||||
| Private cloud | |||||||
| Content delivery network (CDN) | |||||||
| Cloud or private cloud data residency options |
Privacy and compliance
| Opt-out / Do Not Track option at the individual tag level | |||||||
| Option to enable zero-cookie load | |||||||
| Tags and tag categories fired based on consent status | |||||||
| Several privacy modes for session and event tracking | |||||||
| Option for a built-in consent manager |
Download the full comparison to see the rest of the features and how the vendors compare to one another:
read also
Comparison of 7 tag managers – 70 factors from tag types to privacy
Understand the differences between Piwik PRO Tag Manager, Google Tag Manager, Tealium IQ Tag Management, Segment, TagCommander, Matomo Tag Manager and Ensighten Manage
The post 70-point comparison of 7 tag managers appeared first on Piwik PRO.
]]>The post 3 ways to track single-page applications (SPAs) with Tag Manager: a step-by-step guide appeared first on Piwik PRO.
]]>The right approach to tracking SPAs
SPAs react to user interactions and dynamically rewrite the content of the current page instead of loading a new one. Those traits contribute to a smooth experience, but at the same time they make SPAs tricky to track with regular web analytics. How are we supposed to analyze pages that never really reload?
The answer is: with a Tag Manager. Using a Tag Manager lets you go beyond standard browser-reload based tracking without the need for creating your own method of observing and interpreting user interactions.
Creating a tracking plan is key
Before we dive into the practicalities, let’s talk about a tracking plan. In the case of SPAs, it will be different than with multi-page apps. Since there are no real pageviews, you need to determine what actions you want to consider as pageviews – screen reload, view reload or maybe something else? Those will be your key interactions.
More granular actions should be tracked as custom events, and key custom events should be considered as conversions.
And what if I can’t assign conversions?
Well, at first, you may struggle with deciding which actions to label as “conversions”. Fortunately, with Piwik PRO you don’t have to decide right away. You can wait for ideas to bubble up as you gather new information about user behavior in your app.
read also
Comparison of 7 tag managers – 70 factors from tag types to privacy
Understand the differences between Piwik PRO Tag Manager, Google Tag Manager, Tealium IQ Tag Management, Segment, TagCommander, Matomo Tag Manager and Ensighten Manage
Building conversion funnels
After you have a hierarchy of pageviews and events in place, it’s time to group them into conversion funnels. This will give you an understanding of what the customer journey in your application looks like. You’ll see where users convert and drop off.
Not sure what steps your funnel should contain? Thankfully, you don’t have to define that right away either. In Piwik PRO you can build funnels out of any type of pageview and custom event. In addition, funnels are:
- Retroactive – they present historical data tracked before the funnel was defined
- Available immediately after creation
- Flexible – they don’t require a goal as a last step
- Filtrable – they allow you to define each step in the funnel at a very granular level
No matter when you decide to configure your funnel, you’ll always have access to a full dataset of both historical and recent user actions.
You can also examine how visitors use your application with the user flow report. Learn more about it from this helpful guide.
Make sure you document your tracking plan. You can use a spreadsheet or any other format you’d like. Write down each event, page view and stage of the funnel and use it throughout the whole process. That gives you better control over your actions and makes sure everyone involved is on the same page.
Learn more about it here:
How to integrate Tag Manager with an SPA
Once you’ve established a hierarchy of events and pageviews, it’s time to consider how Tag Manager will communicate with your site and to put your tracking plan into action.
There are at least three ways to go:
Manual integration – slow and burdensome
With manual integration, all events are detected by Tag Manager configurations that capture either specific events or groups of dynamically parameterized events.
It’s definitely more labor intensive, since you have to consider each scenario, screen and type of control separately. It also requires lots of testing to ensure that the tags are working properly in all cases. For instance, the same button may appear on multiple views, but it may not always be the same object for Tag Manager – this depends on how the app works with its HTML code.
What’s more, changes in the app’s code may affect the performance of your implementation. In the long run, this can multiply implementation costs depending on the amount of work put into those tweaks.
But if for some reason your organization requires this kind of approach, here’s where you will find more guidance:
- Why virtual page view is important in funnel analytics
- Piwik PRO custom event tag
- Custom event use cases
History change – fast and convenient
A far quicker and easier way is using the History change trigger. It’s perfect for tracking SPAs that update the URL in the address bar when visitors are navigating through them.
When you enable a History change listener, it will monitor the browser history and wait for the moment when the URL of your SPA changes. There’s no need for manual integrations, a special library, workarounds, ugly hacks or tampering with your application’s code. All this contributes to the durable popularity of this method.
Here’s how to configure a virtual page view tag with the use of the History change trigger in Piwik PRO Tag Manager:
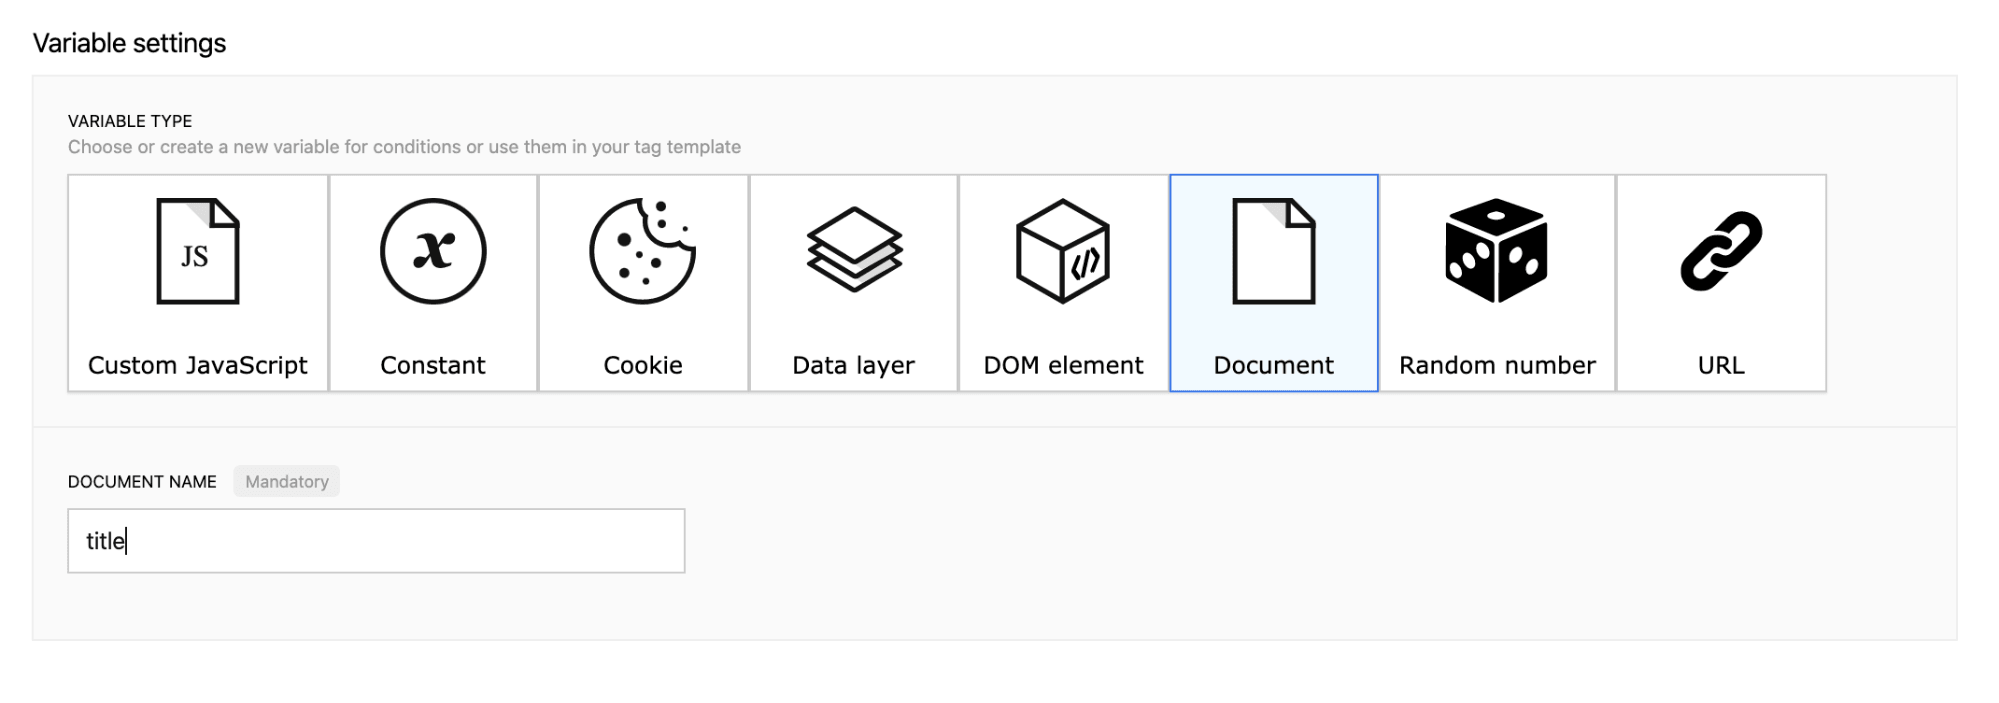
1. Create a new Document variable and type in “title” as the variable content:
2. Then, create a new History change (SPA) trigger:

3. Next, create a new Piwik PRO Virtual Page View tag:
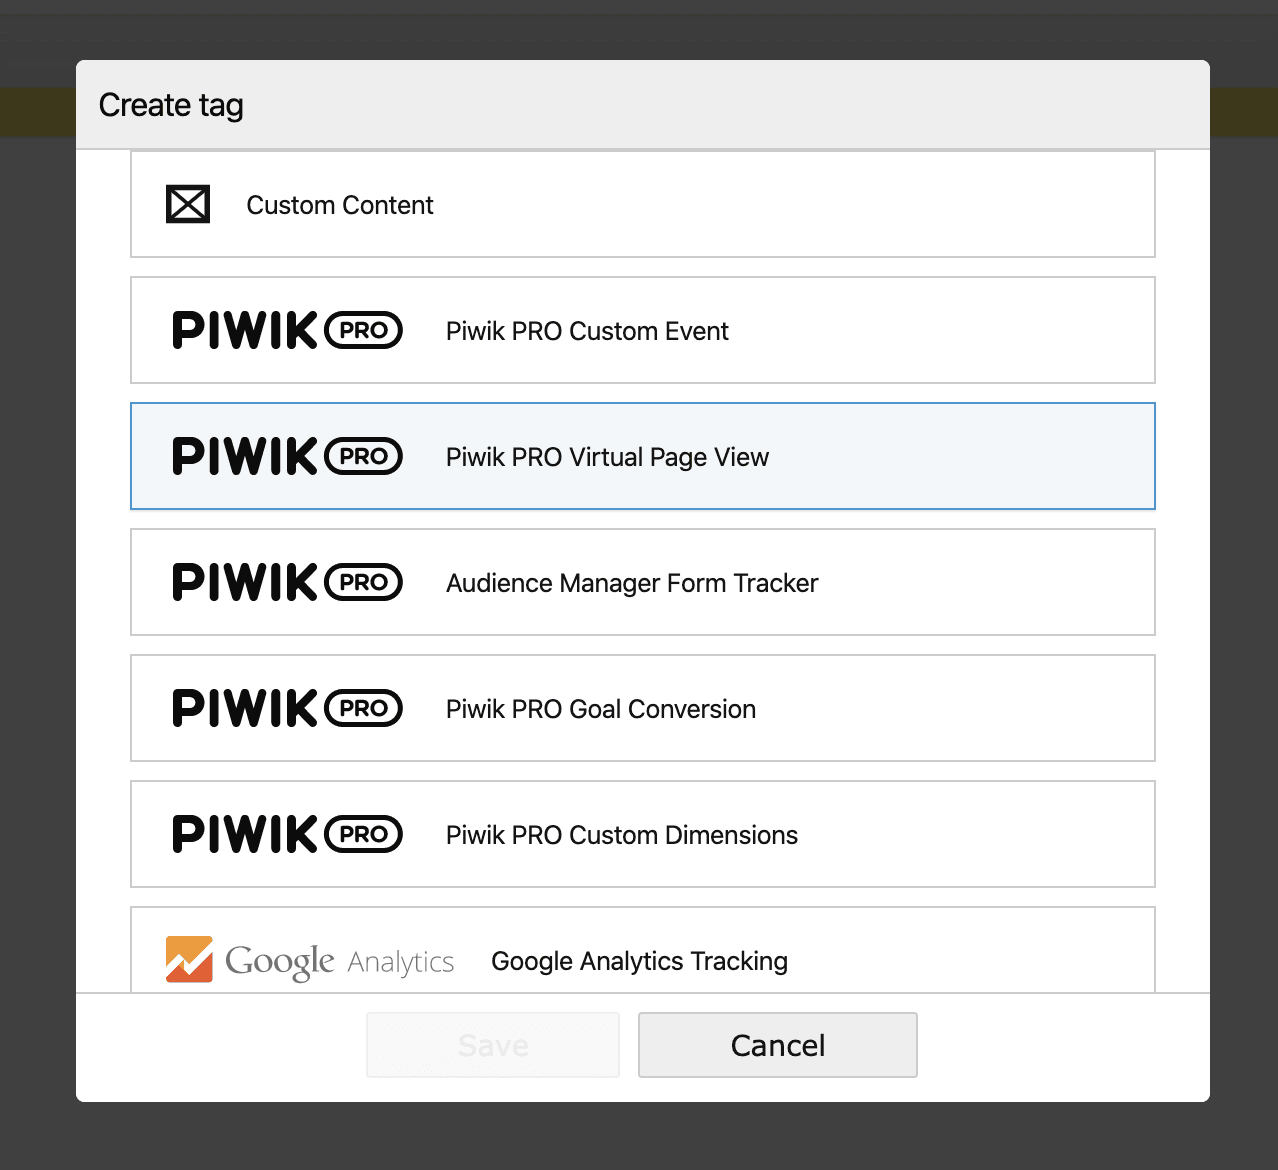
Set up the tag:
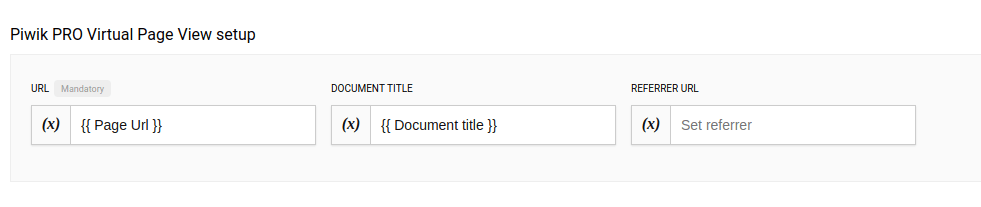
In the URL field, type in: {{ Page Url }}
In the Document Title field, type in: {{ Document title }}
Ignore the Referrer URL field as it’s not necessary in this case.
4. Add a relationship between the newly created tag and trigger:
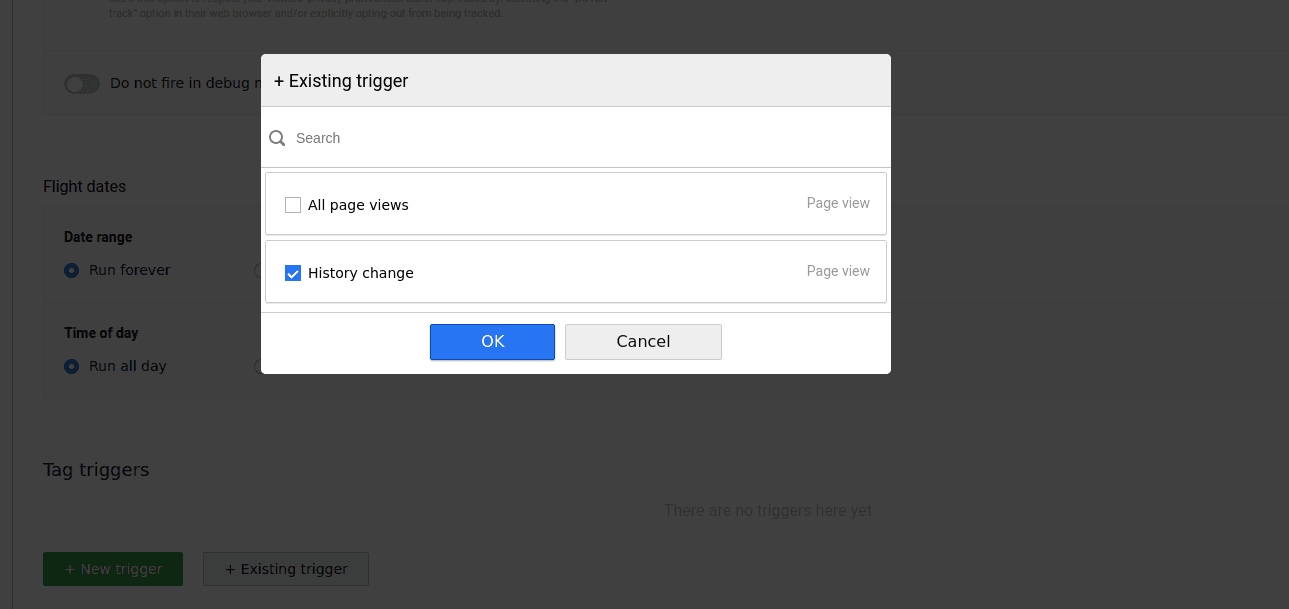
Then, save the tag. From here it’s a matter of testing the container, debugging and publishing the changes, then you’re done!
By default, the tag fires on all history changes, but you can adjust its conditions so that the tag fires for a certain page. To learn more, be sure to check out this article about the History Change trigger in our help center.
Data layer – reliable and future-proof
The History change trigger is easy to configure, but it won’t be useful for all types of single page apps, as some of them don’t present user paths in the browser’s address bar. For example, there are SPAs that don’t update the browser history. This is when data layer tracking comes in handy.
In case you’re not familiar with the notion: a data layer is an ordered array of events that can be posted by your SPA and picked up by Tag Manager as they occur.
In this way, you can pass almost every action a user performs on your site, app or portal through the data layer, then a Tag Manager can translate the details into descriptions of various types of events in your analytics.
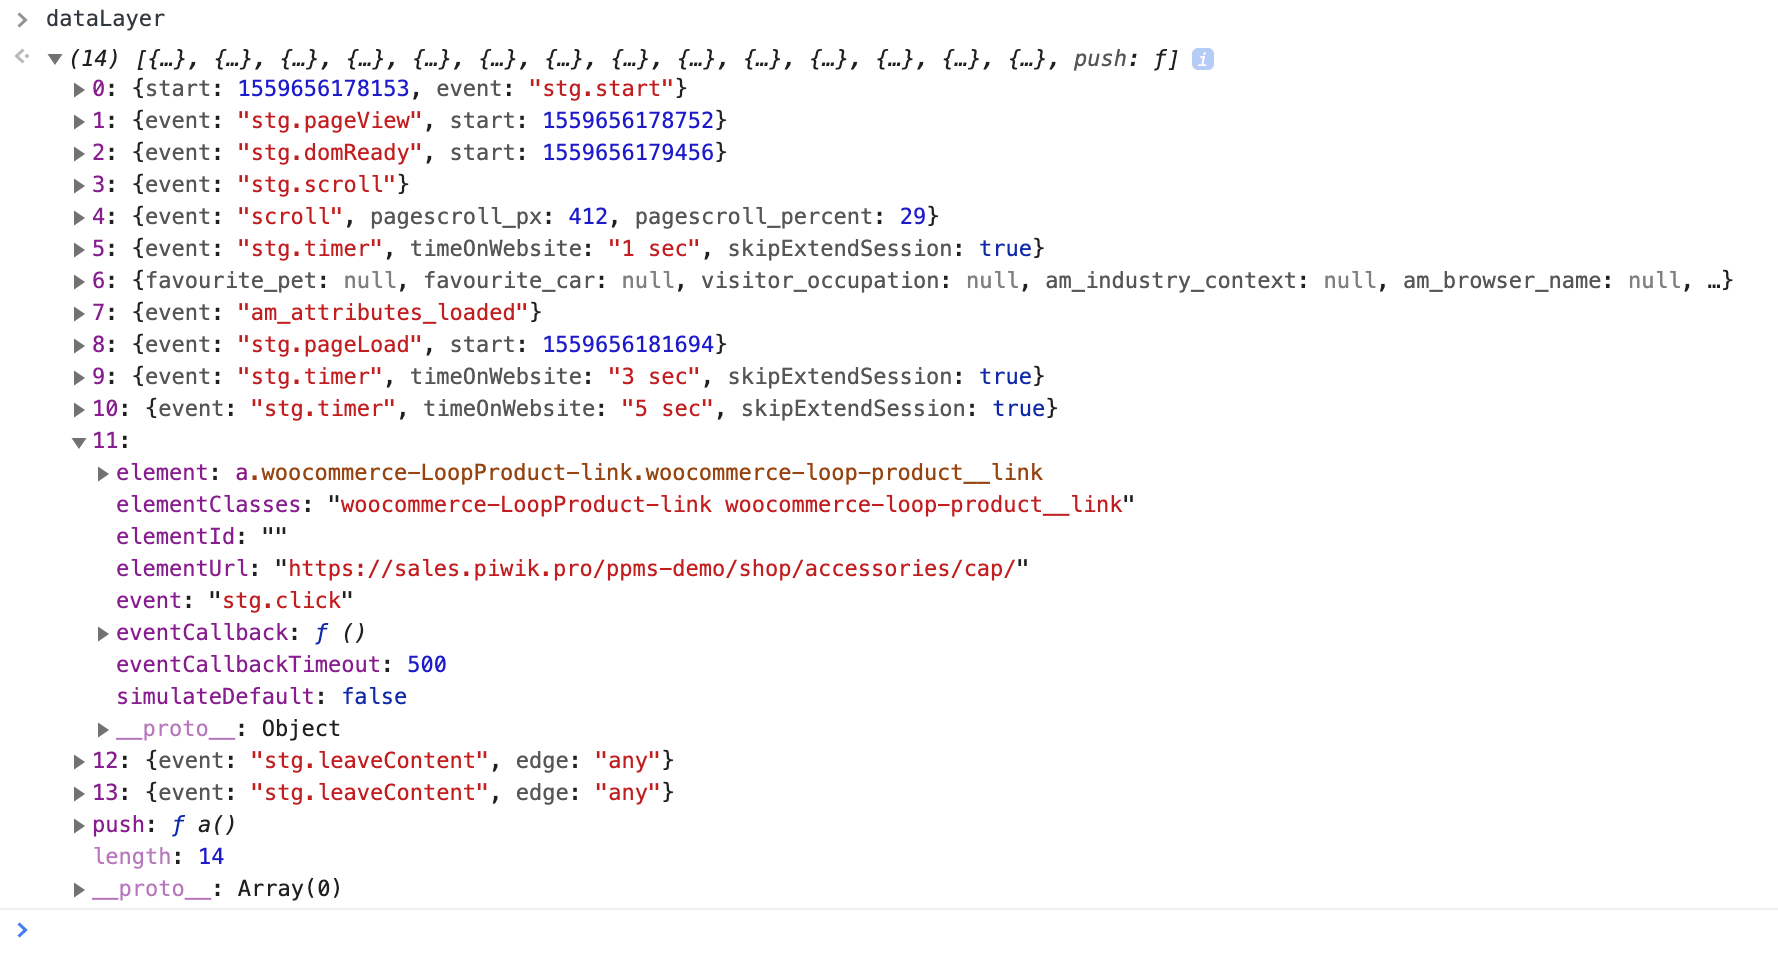
This is what a page view communicated to a data layer typically looks like
window.dataLayer.push({
   	event: "analytics_interaction",
   	event_type: "screen_load",
   	screen_url: "/contact-us-page",
   	screen_title: "Contact us",
   	screen_previous_url:"/home"
});
And this is a custom event representing a granular interaction within such a pageview:
window.dataLayer.push({
	event: "analytics_interaction",
 	event_type: "button_click",
	button_type: "CTA",
	button_name: "Contact us"
});
When you use a data layer, Tag Manager picks up every interaction posted to the data layer instead of scraping the information passively from the website. You don’t have to worry about missing out on data, because data layer implementation is consistent throughout your whole application. Every view and UI control posts events in the same way, so you don’t have to create separate tags for each page or button.
That contributes to greater data accuracy.
Other advantages of a data layer are:
- it’s stable and won’t be affected by changes to the app layout
- it simplifies implementation architecture, reducing long-term maintenance and development costs
- it makes you vendor-agnostic, because you use the code of your application to post events, so any solution can pick them up in the same way from the data layer
All this makes it a great way to track SPAs.
However, maintaining data layer standards takes work. To ensure your data layer does its job, you need to remember about applying the proper labelling of tracked actions. Your event descriptions and variable names should be as generic and consistent as possible. Otherwise, it will be hard to make sense out of them.
This is where the potential drawback of this solution comes from – if your naming convention is not consistent, your IT department will have to fix it. And if you don’t have data layer documentation, you’ll need to create it. This will, however, pay off in the long term.
If you want to read more about data layers and how they can benefit your analytics, be sure to check out this blog post:
How Data Layer Helps You Improve Your Analytics Strategy
Now, let’s get to more practical applications of data layers in Tag Management Systems.
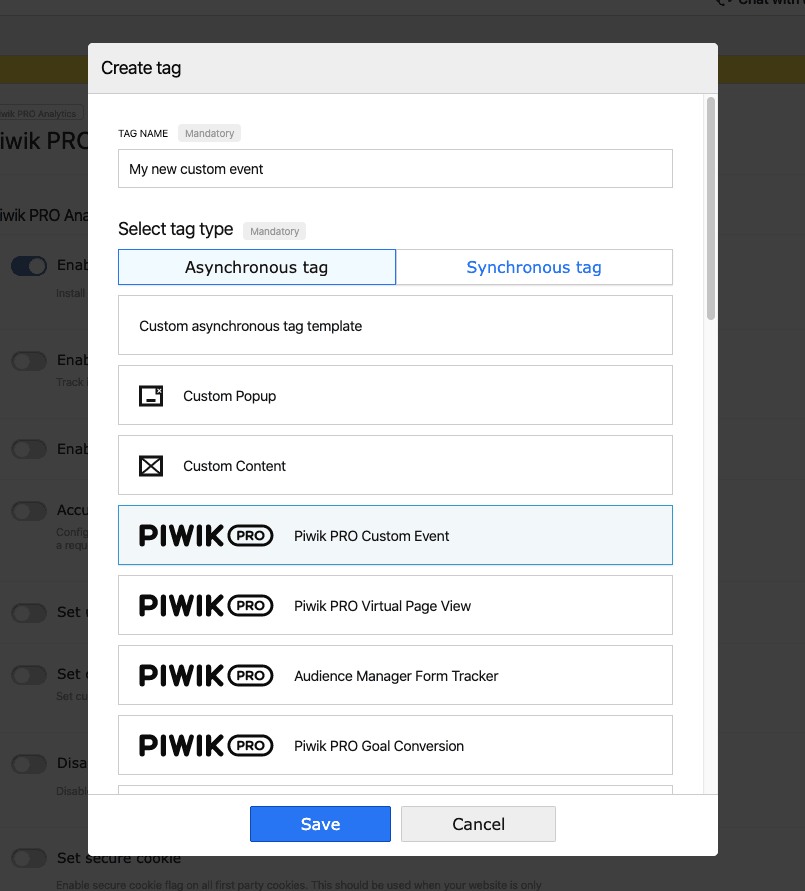
1. Creating custom events
Pushing a new event to the data layer lets you use the event trigger. This helps you define more precisely when a tag is fired. For example, you could create a new event when a user finishes watching a video and then show a pop-up to this user.
Here’s how to create a custom event using a data layer in Piwik PRO Tag Manager.
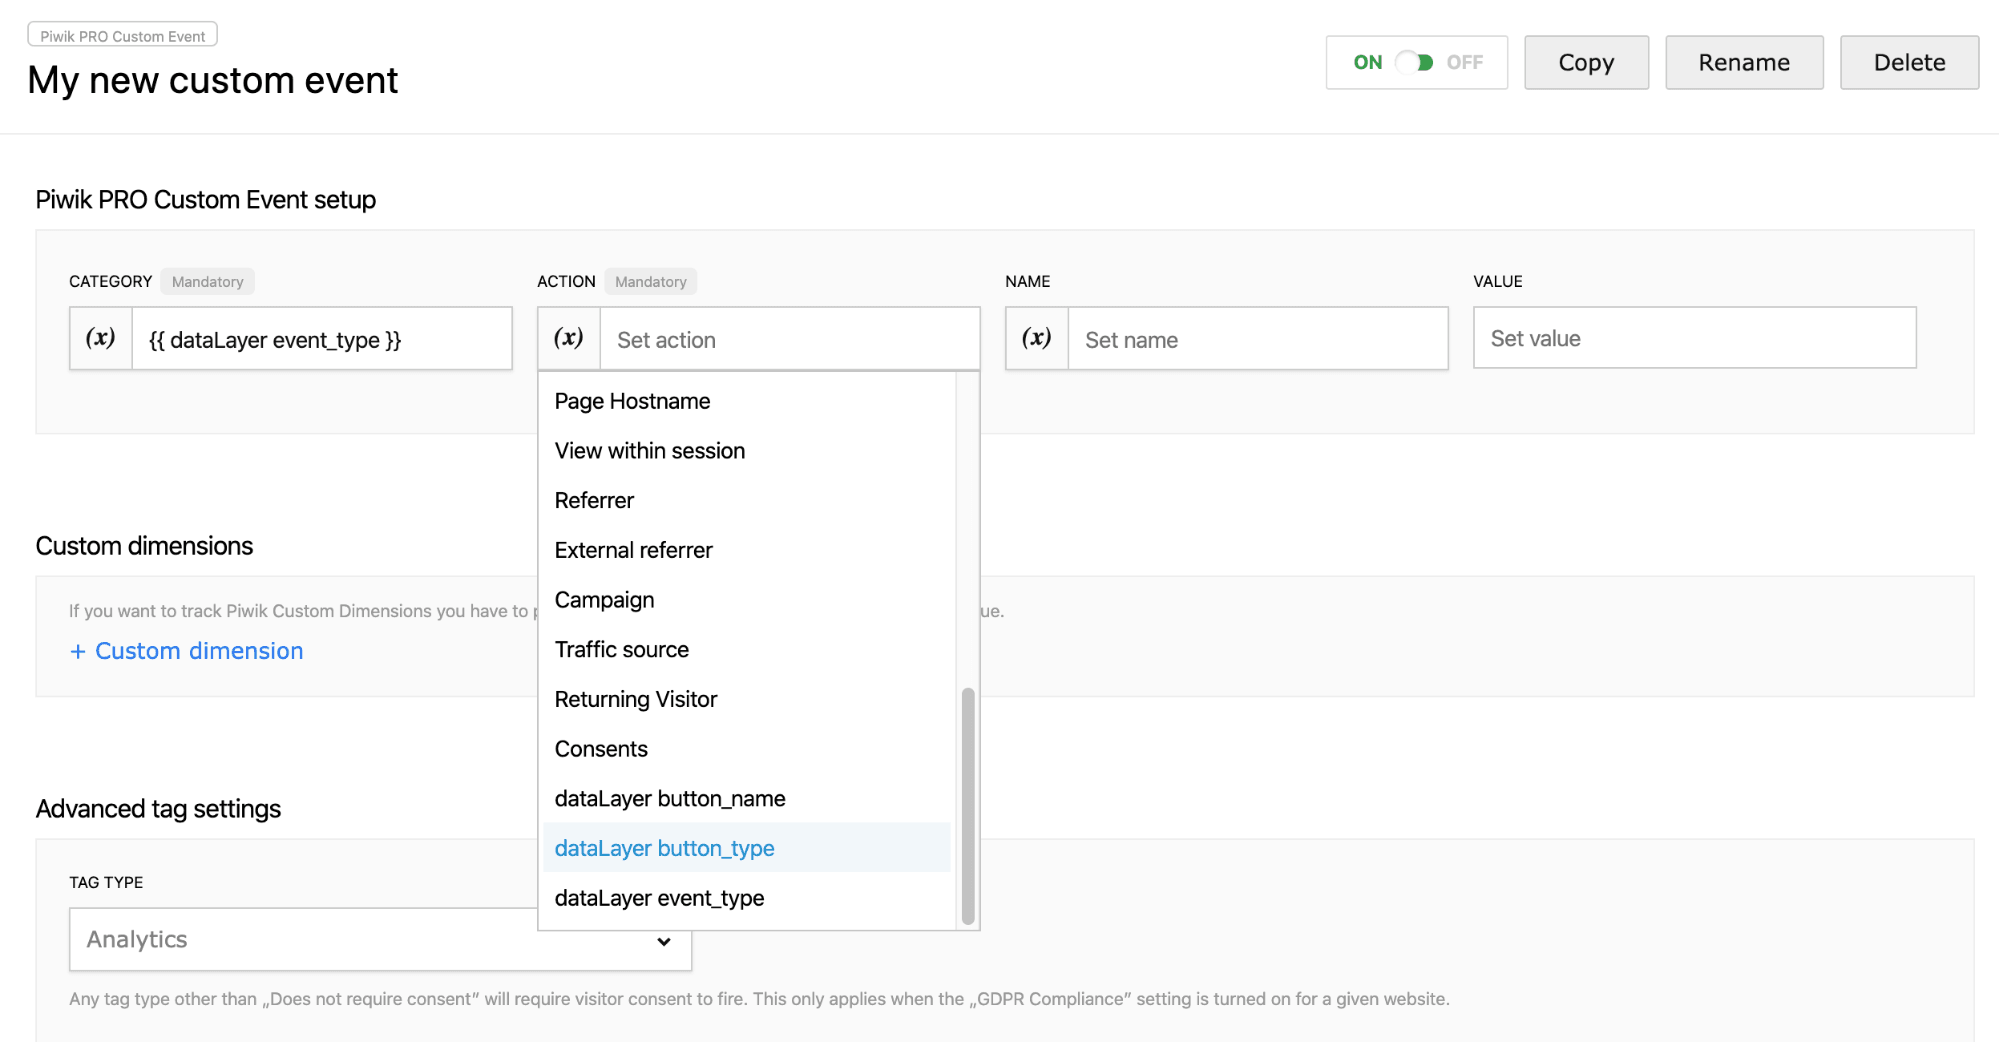
In our case, the data layer’s “event” value is what you need to create your trigger, and “event_type, “button_type” and “button_name” are the values you’ll use to set up your variables.
window.dataLayer.push({
	event: "analytics_interaction", // MAIN TRIGGER CONDITION
 	event_type: "button_click",     // VARIABLE - USED IN TRIGGER CONDITION
	button_type: "CTA",             // VARIABLE - USED IN EVENT DESCRIPTION
	button_name: "Contact us?"      // VARIABLE - USED IN EVENT DESCRIPTION
});
First, map each variable you want to use to describe the event with Tag Manager Variables. This will allow you to choose them from the dropdown list when configuring your tag.
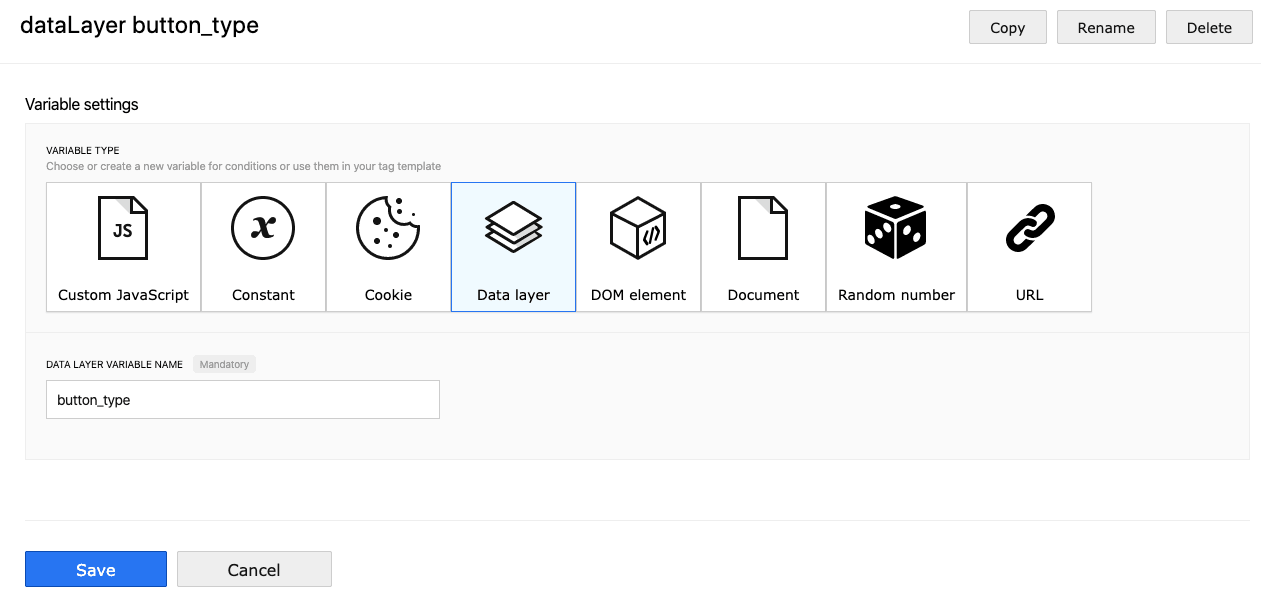
After it’s done, create a tag using the Custom Event template:
And choose the correct variables from the dropdown list:
Now, it’s time to define the trigger. You can narrow it down using conditions – in this case, you would define templates (pageview, custom event) for different data layer events. To do so, choose the “Event” type of trigger and configure your conditions:
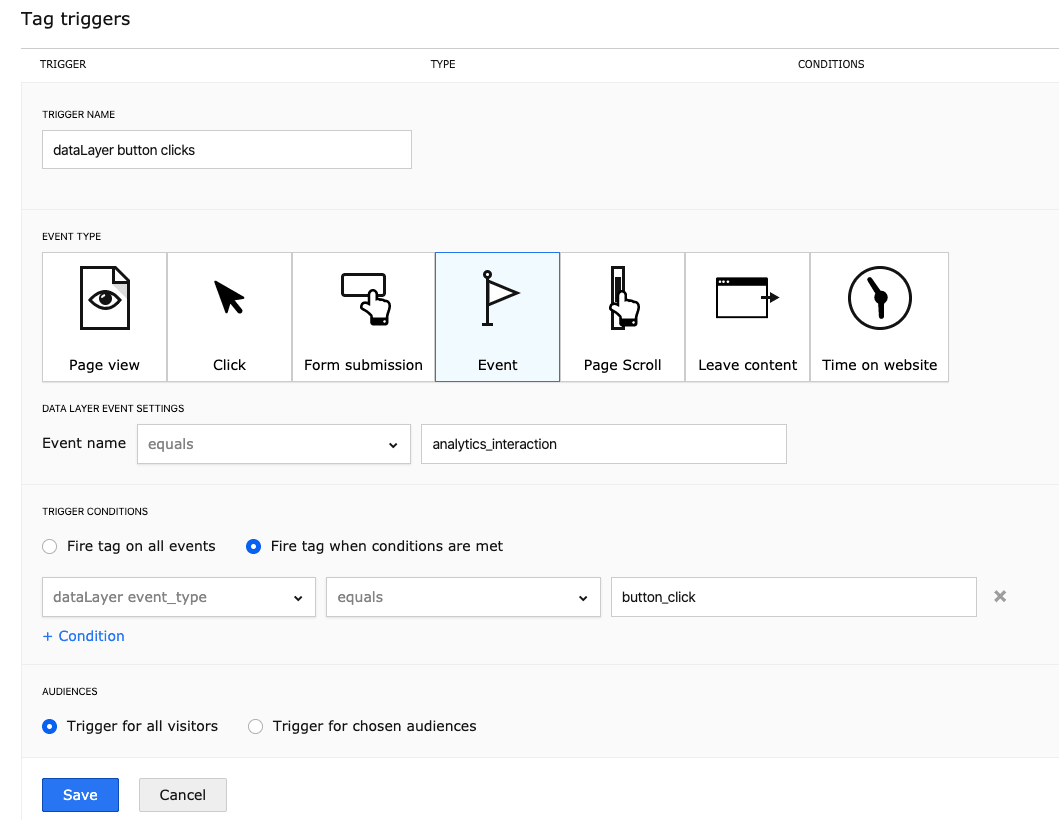
Voila!
2. Building funnels out of a data layer’s custom events and virtual page views
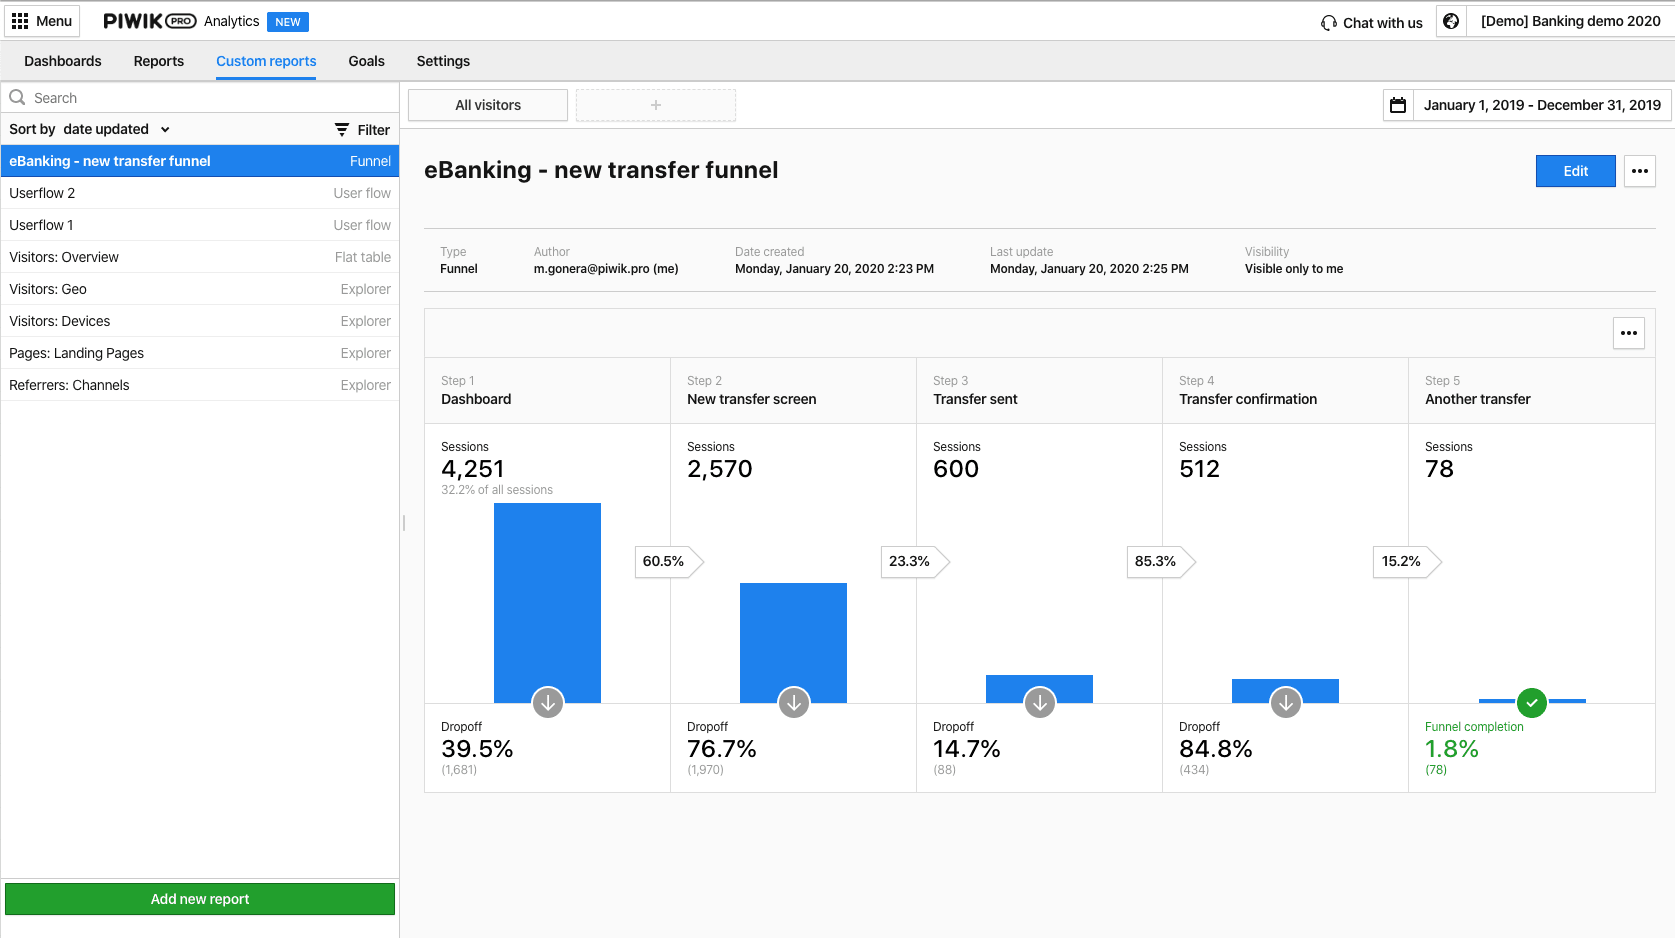
Let’s say you want to track users who sign up in a transactional system and make a money transfer. By breaking the process down, we get the following stages:
- arriving at the dashboard
- viewing a new transfer screen
- sending a transfer
- receiving a transfer confirmation
- making another transfer
Here what this setup would look like in Piwik PRO:
And here’s how you do it:
This content is hosted by a third party (YouTube). By clicking the button below, you consent to loading the video.
Meta setup in Tag Manager
A meta setup in Tag Manager is a way to create a setup for a group of sites or apps. It is also a way to apply it to all of them at once. It includes tags, triggers, and variables. This tool is helpful if you want to run an advertising campaign or simultaneously display the same message on multiple sites or apps.
You need a meta site/app to use a meta setup. If you want to create a setup for a group of sites, you first need to create a meta site.
Let’s look at use cases for meta setup in Tag Manager:
- Meta setup allows displaying a popup (or another form of promotion) across multiple sites based on one meta site (with the ability to customize it per site via variables).
- You can easily install marketing tools for all sites that are a part of the meta site.
- You can quickly create one shareable setup for multiple SharePoint sites (in many cases, most of the setup is identical).
Using a meta setup for your meta sites means simplified tag management. It allows fast-track tag management by importing configurations and using them across your SPAs.
Final thoughts
We hope this post has shown you how much easier and more pleasant it is to track an SPA using the data layer. This method will require some work at the beginning (unification of names), but you’ll soon see it’s the gift that keeps on giving.
If you’ve got any questions, make sure to contact us. Our team will be happy to show you how using a data layer to track your SPA can benefit your organization.
The post 3 ways to track single-page applications (SPAs) with Tag Manager: a step-by-step guide appeared first on Piwik PRO.
]]>The post How to Create Targeted Campaigns by Integrating Customer Data Platform with Ad Platforms appeared first on Piwik PRO.
]]>- analytics data
- information collected via webforms
- any other data imported via webhooks, for example from transactional systems
Better yet, integration with Google Ads and Facebook Ads platforms means marketers can use audiences previously created in CDP when preparing remarketing campaigns.
In other words, because you know your users (even those who remain anonymous), you can reach out to them using tailored ads with Google Ads and Facebook Ads.
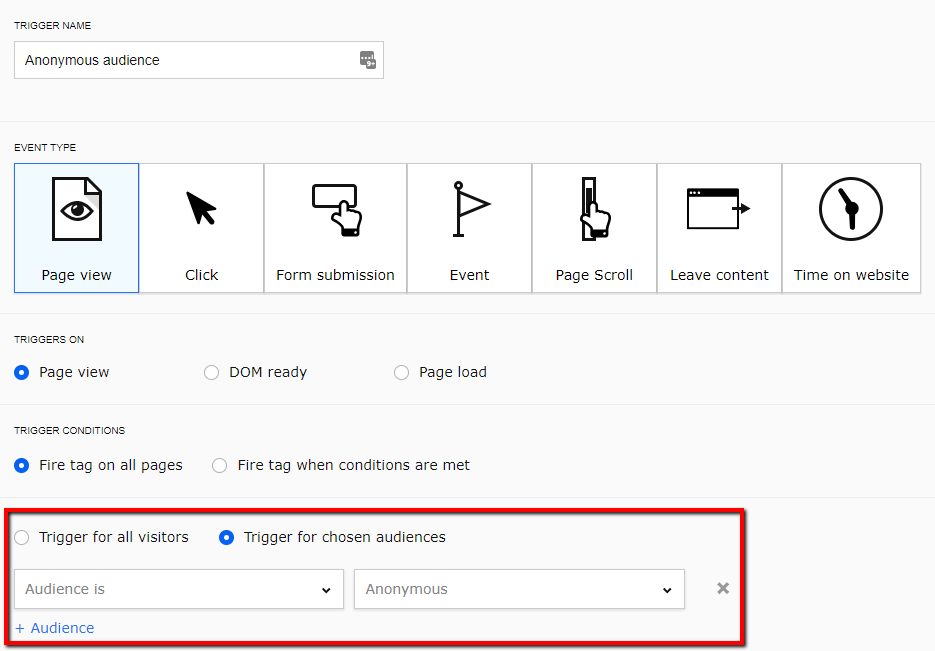
For this use case we’ll create a simple audience containing all the profiles stored in our CDP which are anonymous, meaning their email address is unknown.
This post is a technical guide supplementing a previous post where we discussed the strategy of CDP integration with ad platforms.
Let’s get down to business!
Create an anonymous user audience
In the Customer Data Platform we need to create an audience for anonymous users. Since they’re most likely first-time visitors, we don’t have any info about them yet.
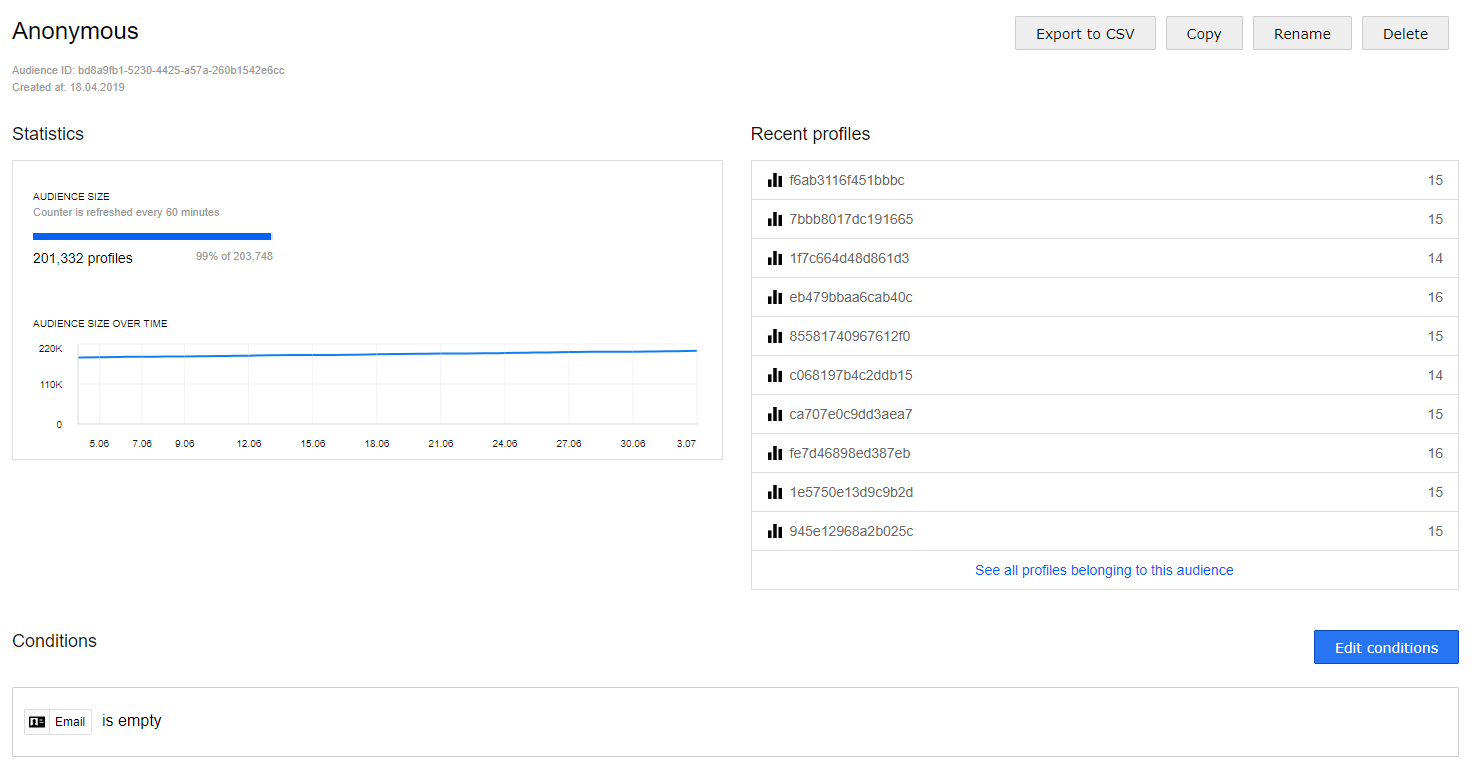
This is a basic example, using only the condition “Email: is empty”, but you can easily add other conditions, for example:
- source campaign information
- location information
- technology information (device, browser, OS)
- custom dimensions
Now that our audience is set up, let’s move on to configuring Tag Manager to fire tags exclusively for our newly created “anonymous audience”.
Creating dedicated remarketing tags in Tag Manager
We’ve created the audience in CDP. Now let’s create a remarketing tag that will fire exclusively for them. This setup allows you to have multiple audiences with dedicated tags. In other words, you can set up several campaigns tailored to diverse custom groups.
For more information about Tag Managers check out this post:
Enterprise Tag Manager Vendor Comparison: Which TMS Should You Choose?
Creating dedicated tags for Google Ads
First, choose the template:

Fill in the Conversion ID and enable “Exporting audience to Google adwords”, selecting “Anonymous”.
The Conversion ID is provided by Google Ads when you configure remarketing to create audiences for campaigns.
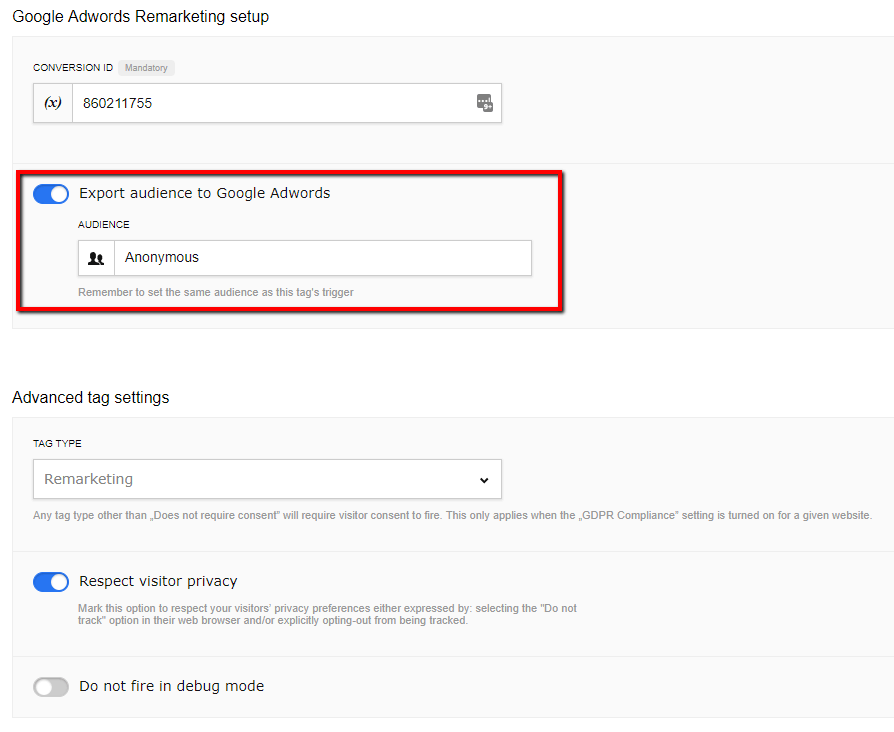
To avoid changing the existing Consent Manager configuration, select the “Remarketing” tag type and “Respect visitor privacy” option.
Creating dedicated tags for Facebook Ads pixel
Tag configuration for Facebook Ads is similar to Google AdWords. The only difference is we have to choose the “Facebook Pixel” tag template from the list:

Provide the Pixel ID and choose the audience to export. Again this will be our “Anonymous” audience.
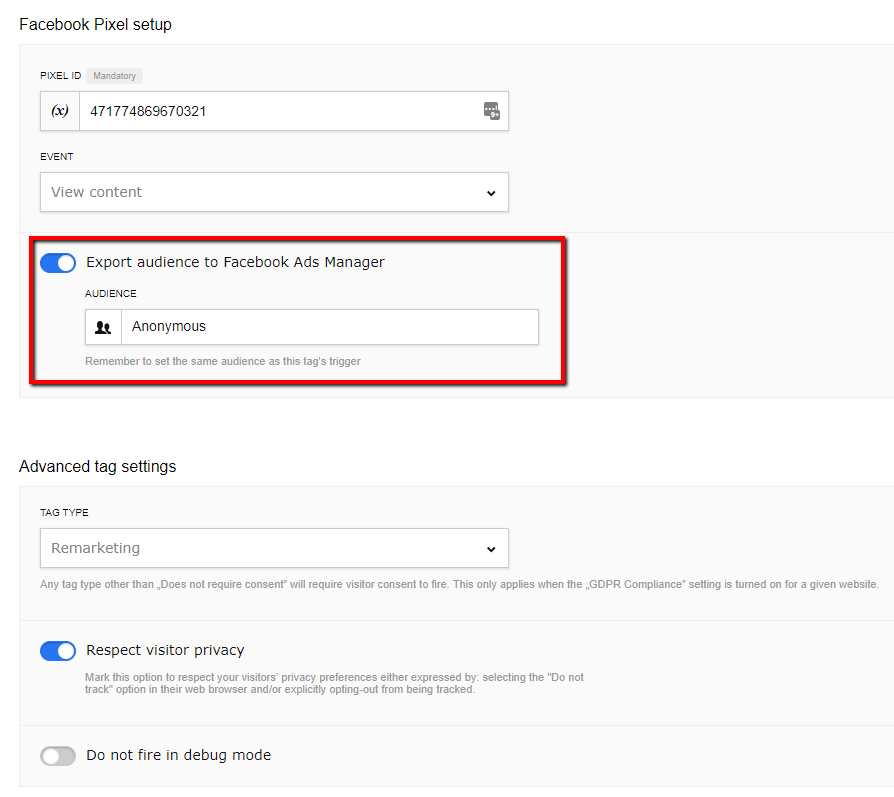
Set up the “TAG TYPE” and “Respect visitor privacy” to work with your consent manager settings.
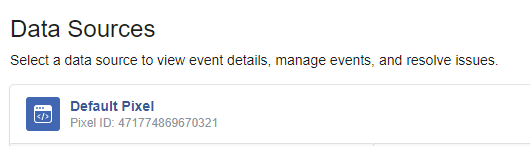
You will find Pixel ID in the “Pixel” section of the Facebook Ads manager panel:
Triggering the tags
During the creation of our Google and Facebook Ads tags the following message is displayed under the “export audience” option:

This is a reminder that in addition to exporting this audience we also need to set our corresponding tags to only fire for this audience.
We only want this tag to fire for the “Anonymous” audience, so here’s what the trigger configuration should look like in this case:
Both new tags (Google Ads and Facebook Ads) will have the same trigger configuration, so we only need to create this trigger once, then select it from the list when configuring the other tags.
Google Ads configuration
So now our audience, tags and triggers setup is finished. It’s time to configure the advertising platforms. Let’s start with Google Ads.
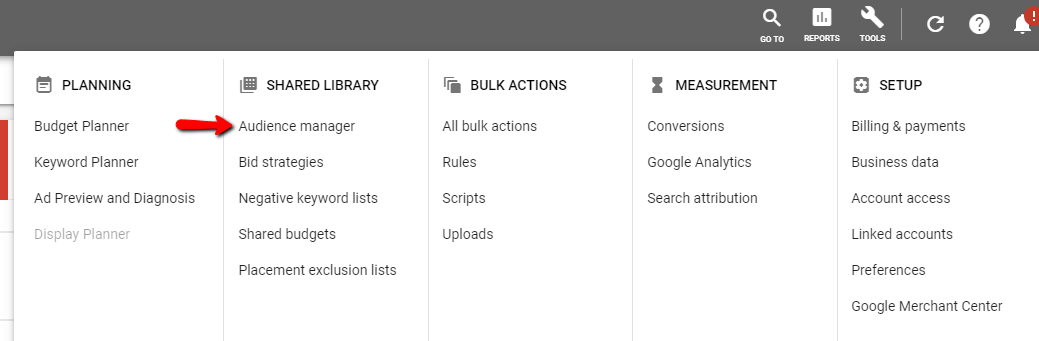
Go to Audience Manager in Google Ads:
Now we configure a new audience:
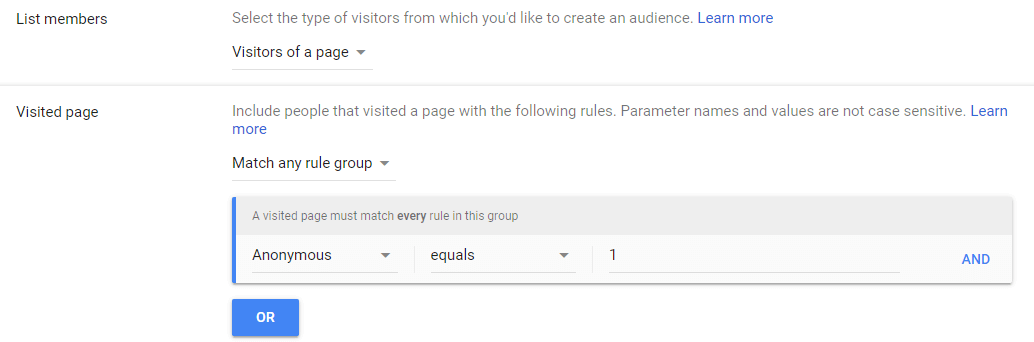
The “Anonymous” audience is already available because Piwik PRO previously fired the tag for users matching the anonymous profile criteria and sent requests to Google Ads for this audience.
To use this audience we have to set 1 (true) as the value.
Depending on the size of the audience, you should wait at least 24 hours to give Google time to record the request. If the audience is very specific it can take more time. If the audience is general it should be ready the next day.
Facebook Ads configuration
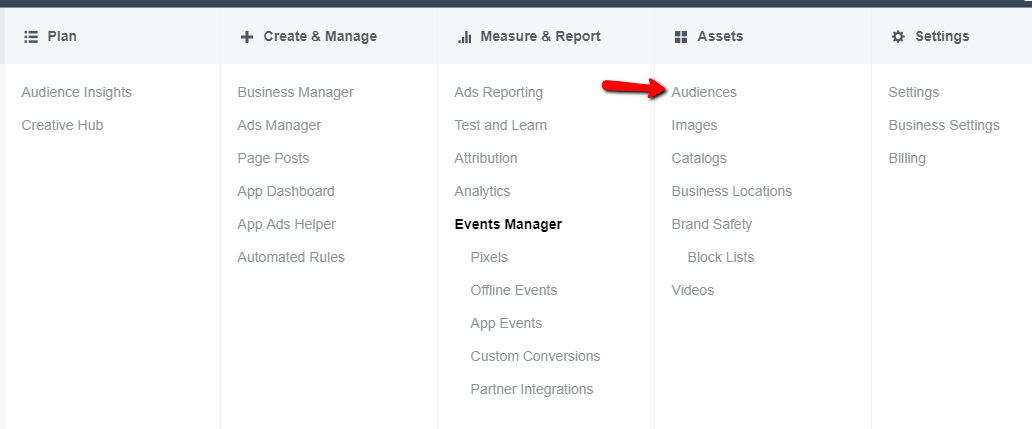
Navigate to the Audiences section in Facebook Ads:
Again, we have to create a new audience in order for our “Anonymous” audience to be available, and Facebook has to receive a request from Piwik PRO Analytics Suite. How long it takes to receive audience specific requests depends on the size of the audience and traffic volume.
Comparison
Free comparison of 7 enterprise-ready customer data platforms
Get to know over 50 key differences to determine which platform fits your business needs best: Tealium, Amplitude, Exponea, mapp, Segment, mParticle or Piwik PRO.
Reviewing the audiences
After some time you can check how well the ad platforms are populating the anonymous audiences and if they’re ready to use for retargeting.
Google Ads
From over 201,000 profiles Google was able to match a few thousand.
It’s worth pointing out that Google is constantly building this list, and it contains highly anonymous profiles which are more difficult to match.
Facebook Ads
Facebook is matching anonymous profiles from our audience with its user base. The size of the FB audience is still quite small because it’s exclusive to anonymous users, but we can expect this to grow over time.

Conclusion
Integration of multiple tools like CDP, Tag Manager, Google Ads and Facebook Ads gives marketers the opportunity to increase conversion rates and improve visitor engagement through highly targeted remarketing. We hope this walk through will help you configure your own platforms to get the most out of the tools you’re using. If you have any questions about CDP integrations or anything else analytical, don’t hesitate to reach out!
The post How to Create Targeted Campaigns by Integrating Customer Data Platform with Ad Platforms appeared first on Piwik PRO.
]]>The post How data layer helps you improve your analytics strategy appeared first on Piwik PRO.
]]>data layers also offer a great method for structuring data, and can provide a clean perspective on data you use for a range of purposes. What’s more, they can be paired with the tools you use that take advantage of structured data storage on site.
In this post we’ll focus on the benefits it can deliver to your marketing team. We’ll also provide you with plenty of background to make things easier to understand and apply later on. Here we go!
What is a data layer?
In case you’re not familiar with the notion of a data layer, you might feel overwhelmed reading that it’s a “JavaScript Array” and you need to do some coding to make it work.
While the truth is that data layers require some extra effort – meaning you should team up with developers at the beginning – the long-term payoffs are significant. Once the ball is rolling, maintenance gets simpler and the implementation of custom tracking measures is made easier.
Under this complex layer there is a data structure that holds information you want to process and then sends it from your website to other applications, like a tag management system.
In this way, you can pass almost every action a user performs on your site, app or portal through the data layer, then a tag manager can translate the details into variables and dimensions in your analytics.
Let’s dive a bit deeper: when a visitor interacts with your website, the data layer will store this data as an event. Your analytics data is enriched with a record of all user behaviors, increasing opportunities for website or web-based application tracking.
However, a data layer has certain limits. It records only events happening within a single page view. If your visitor reloads the page, you get a new event queue.
A data layer helps you store:
- all information about user actions, such as page load, page view, scrolls, clicks, exit intent
- additional pieces of info for your marketing needs, like product IDs, product price, cart value
Furthermore, you can set more than one instance of a data layer for a single page view. And if you use multiple tools that feed from this data structure, they won’t override any information in case the same data or variables are used.
Follow the golden rule
To ensure your data layer does its job, one good practice is key: applying the proper labelling of actions to be tracked. Otherwise, translating business requirements across diverse departments like marketing, finance and human resources can be difficult.
That’s why event descriptions and variable names should be as tool-agnostic, generic and consistent as possible.
Here’s what these terms mean:
- Tool-agnostic: Variable names and values should be clear, precise and serve their purpose rather than the tool.
- Generic: Variables should be applicable to as many use cases as possible while remaining flexible in case of future changes to your website
- Consistent: Variables need to follow a single naming scheme to avoid confusion
Take note! Changes to the layout and styling of a website or product don’t impact the data layer itself. However, you should review it after each significant website update. All new website or product functionalities should be reflected in the data structure.
Why you should use a data layer
As we’ve already mentioned, data layer implementation brings you significant benefits. But why exactly you should invest in such a solution?
As regards analytics, the main goal of a data layer is to make implementation of custom tracking easier. Also, information stored in this data structure is easy to access and then act on to improve the user experience of your site, app or other product.
Moreover, it’s an ideal solution for collecting data in login areas. You can use the particulars on both users and accounts to run personalization campaigns.
For more details on applying a data layer for post-login areas, check out our post:
How to Work on Analytics Platforms and Not Overwhelm the People You’re Doing It For
But that’s not all. Here are some more benefits of Data Layers:
- readily accessible variable values for reporting and marketing
- eliminates DOM (Document Object Model) scrapping*
- reliable architecture for deploying triggers for different types of tags
- easier communication between website/application with other tools like tag manager, analytics
- simpler debugging
- enables testing for changes or new features more easily.
*DOM scraping – using elements that are already on the page, like page titles, classes, IDs, URLs, etc. instead of waiting for developers to collect that info into a structured data layer.
Examples of a data layer
To give you a better understanding of data layers and help visualize the elements they hold, it’s best to see some real-life examples.
Let’s start with the basics. Below is a simple representation of this kind of data structure with just two records:
dataLayer
   (2) [{…}, {…}]
      0:
          event: "some_event_name"
          some_variable: 123

      1: {event: "some_event_name", some_variable: 123}
However, things are usually a bit more complex, and you’ll have a long list of different elements like this:
This particular record contains a more diverse list, with things like page load, page view, scrolls, clicks, URL, exit intent. These are all things you can apply to a typical configuration of a tag manager in an analytics implementation. Each event recognized by the tag manager is reflected in the data layer.
The data layer as a middleman
A data layer can translate the data on your website so different tools can easily use it. It ensures communication between a website/product and tag management system. For instance, the website can tell a tag manager that a page or another step in the cart has been loaded.
Furthermore, such communication is possible with other tools used in activities like A/B testing or remarketing, for example.
On the website side
Your website can share different kinds of data with various tools. Now we’ll focus on the bits that you might need in analytics. Some practical examples:
- actions involving user behavior on the site: clicks, scrolls, exit intentions, etc.
- web form interactions: field value, selected choice, etc.
- e-commerce data: cart content and value, purchase value, currently viewed product information
To send any data to a data layer a website uses a push method. In fact, you can pass to this data structure any information you need for a particular purpose. It all depends on your business requirements and analytics strategy.
read also
Comparison of 7 tag managers – 70 factors from tag types to privacy
Understand the differences between Piwik PRO Tag Manager, Google Tag Manager, Tealium IQ Tag Management, Segment, TagCommander, Matomo Tag Manager and Ensighten Manage
On the tag manager side
Looking at the other end of this communication path, your tag manager offers you a convenient way to provide important data to other tools running on your website. For instance, your tag manager can be configured to submit contextual information like data layer events. Then, other tools can use data captured via tag manager mechanisms – like JavaScript or DOM-scraping variables.
This is just one example, and you can capture different kinds of data. For instance, Piwik PRO Tag Manager sends to the Data Layer by default details like:
- page load
- time on a page
- exit intent
- consent manager settings
- custom event descriptions and values
What’s more, to exchange information between different tools, a data layer uses a unified notation of events, i.e. nomenclature of events. This comes in handy when you want to implement a consent management system.
For example, in Piwik PRO Consent Manager & Tag Manager, users’ consent decisions can be stored in the data layer and are available at the moment users make them.
Based on these consent choices, you can configure triggers in the TM and then send this data to your CRM. Later, you can apply these records together with other customer data from CRM (like direct phone contact, email campaigns) in diverse marketing initiatives.
Data layer use cases
So you’ve got the theoretical background, now it’s time for practical steps. We’ve said that a Data layer enhances your tracking capacities, and here you’ve got some powerful use cases. The most beneficial one is employing it by applying variables for personalization campaigns. Have a look at some examples.
Widget tracking
Let’s say you’re using a custom chat widget and you want to track user engagement. The problem is, this is invisible to your tag management system as it’s not an integral part of the website. It’s simply loaded dynamically during the page view.
By using the push method, you can send records of each action a user performs to the data layer. With this data about the user, you can trigger the desired tags in your tag manager for different marketing campaigns.
Single Page Applications (SPAs)
When it comes to SPAs, you always need to expect some extra work. By default they require a custom implementation if you want to track everything correctly. The catch here is that they’re not like a regular website. What they are is a single site that interacts with the user dynamically, rewriting content instead of loading completely new pages from the server.
SPAs load their code only once. This means that your tracking tool can’t automatically detect when a new page is loaded. So you need to configure Virtual Page Views, which is where things get complicated.
We’ve explained quite a bit about it in this post:
How to Track Single-Page Applications (SPAs)
Or you could manually implement all of your custom events, but that’s time-consuming. Also, when updating an application you might be left wondering if everything will work after you’re done. This is often the case for banking systems or other secure member areas.
That’s why using a data layer is more convenient. It’s stable and won’t be affected by changes to a system, styling or layout. It just needs to be implemented correctly. With this extra configuration you can easily set all the triggers you want in your tag manager and that’s it.
Webform tracking
Another example: your user is interacting with a complex web form to get a car insurance quote. They’re entering data and choosing values from various fields. Once all these actions are saved to a data layer, you can take advantage of the data and set up custom triggers for personalization campaigns.
The details you’ve collected will help you expand analytics profiles and later design a tailored offer to boost your upselling and cross selling rates.
Various custom analytics actions
As we’ve already said, the scope of application for a data layer is broad. Alongside some complex tracking, you can take advantage of it for less complex cases to easily trigger:
- custom events of any kind, like clicking on a CTA
- custom dimension values, such as user status: logged in
- virtual page view while creating funnels, e.g. each form field as a funnel step
Conclusion
While implementation can be complex and time-consuming at the beginning, a data layer makes your analytics work later on a lot easier. The effort you put in will pay off in the long run, delivering new tracking capabilities. And it will also save you some worries thanks to better stability.
The more advanced your website/product, the greater a Data Layer simplifies further execution of custom events tracking. This greatly improves user experience through content personalization.
If this sounds like a perfect fit for your organization but you’re not sure how to get started, reach out to our experts so we can discuss the opportunities available to you.
The post How data layer helps you improve your analytics strategy appeared first on Piwik PRO.
]]>The post 4 Sound Reasons to Choose Digital Marketing Platform (+Use Cases) appeared first on Piwik PRO.
]]>A survey conducted by SteelHouse found that marketers use an average of five different marketing and media tools. Many are expanding their use of existing tools for:
- site analytics (84%),
- marketing performance measurement (82%),
- content marketing asset management (80%).
You definitely realize that choosing new tools is a very time-consuming and engaging endeavour.
When considering technology investments, one question always comes up: should you choose a single MarTech vendor, or work with multiple partners?
The short answer is: there is no right or wrong approach. It depends on your company’s strategy and business priorities, your budget, and the relationships you may have already built with your existing vendor(s).
However, things are even more complex, and we’d like to elaborate. That’s why we’ll show you in this article the pros and cons of using one vendor’s products.
We will also present some examples of using the combined strengths of our stack to get better customer insights, boost your content personalization effectiveness, and stay privacy-compliant.
Advantages of using a whole analytics suite
First off, we’ll present some important perks coming with the single-vendor approach:
1) Seamless integration
One of the biggest advantages of a platform is seamless integration with other elements of the stack. After all, vendors that provide a full suite design their products from a holistic perspective. Each piece integrates tightly with the next, so there’s almost no risk of feature gaps.
A suite also significantly lowers the chance of buying components with overlapping features, which is a common problem with multi-vendor solutions. Also, with a multi-vendor approach there’s always the possibility that individual components or solutions will be incompatible with one another.
2) Faster deployment & staff training plus lower procurement effort
A single vendor will generally be less troublesome because there’s only one set of protocols to integrate into your infrastructure.
It also means simpler administration and faster training. The single-vendor approach offers the advantage of buying and learning to use just one set of tools and skills. And by that, a single-vendor approach often decreases the operational costs of using MarTech tools.
3) More responsibility on the vendor’s end
A close relationship with the vendor account team can also bring some soft benefits. A supplier can become a partner with a sincere interest in the success of each project — thus, they will share the risk and the reward of close collaboration.
4) Full privacy compliance and safe information flow
This point is closely linked with the previous one. One of the most important considerations of companies searching for new MarTech software is the security of the data they process. Because they are entities collecting information about users, they also bear the greatest responsibility for data breaches.
And those are very costly – according to the Ponemon Institute, the average cost of a data breach in 2017 was $3.62 million.
However, it’s impossible to calculate the cost of losing customer trust – the stigma of such an event will accompany the company for many years.
Also, they have to obey the data privacy laws of each jurisdiction they operate in (for example: GDPR), and even some sectoral data privacy restrictions.
The more products you use, the greater the chance that one of them may turn out to be a weak link. To reduce the risk, you should consider dealing with just one vendor, and make sure it’s one who is really serious about data security.
If you want to learn the ropes of safe data processing, this free guide may prove useful in your case:
How to Leverage Web Analytics When Your Company is Dealing with Tons of Sensitive Data
Disadvantages of using an entire analytics suite
Of course, there are also some serious drawbacks to consider when setting your mind on a single-vendor approach. Here we detail the two most salient ones:
1) Loss of flexibility and vendor lock-in
As we said before, choosing MarTech software is often a multi-year commitment. Some companies may be afraid of becoming dependent on one supplier. What if they decide at some point to shutter their business or discontinue some of their products? Or if their products cease to meet your expectations? In this scenario, ending cooperation turns out to be much more complicated and troublesome than under a multiple-vendor approach.
2) Not all products are created equal
The upside of single, best of breed products is that they offer features which handle really specific functionalities.
Also, you have a wide choice of specialized systems and vendors to choose from, so you can decide on a product that really satisfies your needs. When it comes to a suite, you have to settle for whatever your vendor offers. Sometimes all their products are really great, and sometimes some of them are just decent, or even below average.
The comparison of 10 web and app analytics platforms
Learn the key differences between Piwik PRO Enterprise, Google Analytics 4, Matomo Cloud, Adobe Analytics, AT Internet, Countly Enterprise, Mixpanel Enterprise, Amplitude Enterprise, Snowplow Enterprise, and Heap Premier.
Some actionable use cases with the Piwik PRO Analytics Suite
As we said earlier, your final decision should be conditioned by many factors. Here, however, we would like to say some more about the practical aspect of using our Analytics Suite. We’ll show you how particular components of the stack integrate with each other to generate substantial benefits.
USE CASE #1: Marketing Campaigns Based on Last Actions of Your Visitors
Personalization is an extremely useful approach to marketing. It significantly boosts the effectiveness of your campaigns.
A Demand Metric study from 2016 found that 80% of marketers say personalized content is more effective than unpersonalized content.
In order to derive tangible benefits from it, however, you need to make sure you’re working with top-quality data.
And this is when the Piwik PRO Analytics Suite comes in handy. With a little help from Tag Manager, Analytics, Customer Data Platform, and Personalization, you can create a campaign highly tailored to the particular interests of users, based for example on product categories that really interest them.
Here’s how:
In Tag Manager, you configure custom events to record information about the last action taken by your users (about the product they visited or the banner they clicked).
According to Marketo, 79% of consumers say they are only likely to engage with an offer if it has been personalized to reflect previous interactions the consumer has had with the brand.
This information is sent to Analytics, and then you can configure event mapping to store selected information in the profile’s attribute in your Customer Data Platform. With this component you can create audiences of people whose last actions on the site were related to specific product categories.
These audiences can later be used to create personalized campaigns using the Personalization instance. For example, you could:
- create dedicated pop-ups which will display discount codes to returning visitors for products from a certain category,
- personalize the homepage background to remind users about recently viewed products,
- adjust the content of sidebars to the interests of your users.
USE CASE #2: Increased Customer Retention
As we have repeatedly mentioned in our articles, customer retention marketing (also known as customer lifecycle marketing) is a tactic that brings many benefits, including financial ones.
According to a report by Forrester’s, recruiting new customers costs five times as much as retaining existing ones. What’s more, it is 16 times as costly to build a long-term business relationship with a new customer than simply to cultivate the loyalty of an existing customer.
The combined forces of our products can help you in cultivating this customer approach in many ways.
For instance, setting the right goals in Tag Manager will let you determine a group of Customers at risk – those who used to buy a lot from you, but have recently lost interest in your brand.
For example, by triggering certain goals, you can find people who:
- haven’t made any purchases in a long time (for example, for the last two months), but
- their last purchase was for a very large amount, and
- previously they used to make purchases much more often.

On that basis, in the Customer Data Platform you can create an audience containing a group of this particular type of customers. Then you can use it in the Personalization tool to serve the audience with pop-ups encouraging them to re-engage with your brand (for instance, displaying a special discount code). Or, you can use this data in your next email marketing campaign, sending personalized messages to all members of the given audience.
USE CASE #3: Boosted First Time User Experience
The importance of making a good first impression on users is clear. This rule is particularly applicable to pages with a complex navigation mechanism or those that offer numerous features. For instance:
- mega-sites typically owned by a large organization, encompassing a broad range of services or products, or
- mobile applications in general.
If users feel lost or unable to take the desired action, it’s more than likely that they’ll leave your page or remove your app as soon as possible. But it doesn’t have to be that way. To avoid this scenario, you can use a combination of Analytics, Tag Manager, and Personalization.
These products allow you to successfully separate first-time visitors from recurring users. You can serve a special introductory tour to the first group (in the form of onboarding screens or a video) around your website or app, explaining particular features of your product.
If you want to read more about mobile app onboarding, check out this extremely informative blog post from Usability Geeks: Mobile App Onboarding: How To Do It Right.
This kind of walkthrough will help your fresh visitors better understand your product and feel more confident when using it for the first time. And this will certainly translate into some tangible benefits – according to CleverTap, a good onboarding experience results in a 90% boost in user retention!
USE CASE #4: GDPR-compliant data at your service
As you probably know, there’s a new EU data privacy law coming into force. One of the most important changes introduced by GDPR is that now you have to acquire consent before you process user data (like cookies, IPs, and others). What’s more, among other issues, consents will have to be freely given, specific, informed, and unambiguous.
If you want to learn more about GDPR, we advise you to visit this section of our website.
The Regulation also introduces new obligations related to exercising data subject’s rights, such as:
- right of access (Art. 15)
- right to rectification (Art. 16)
- right to erasure (also known as: right to be forgotten) (Art. 17)
- right to restrict processing (Art. 18)
- right to data portability (Art. 20)
- right to object to processing (Art. 21)
In the case of digital businesses, aligning to the new law will involve multiple adjustments to their analytics tools. They’ll also have to make sure that all their business partners are up to the task and can support them in ensuring compliance.
That’s why we decided to create a solution to help our clients automate a huge part of this process. It’s called Piwik PRO Consent Manager.

Consent Manager has the features to cover the whole visitor life cycle: from getting the consent of a new visitor to addressing data subject rights requests. It supports our clients in:
- creating customizable consent pop-ups and widgets for visitors to get their consents,
- collecting and storing visitor consents to view their history,
- collecting only pre-approved data by firing only accepted tags,
- collecting and managing data subject requests in one place,
- and performing many other tasks related to handling visitors’ consents and requests.
For more information about our new product be sure to visit the GDPR Consent Manager subpage.
If you want to read more about the combined capabilities of Piwik PRO Consent Manager and Tag Manager, here’s a blog post worth checking out:
How Consent Manager and Tag Manager Work Together For Your GDPR Compliance.
Integrated marketing solutions – some conclusions
Of course, there are many more possible applications of our products. And our team would be happy to present them to you.
The comparison of 10 web and app analytics platforms
Learn the key differences between Piwik PRO Enterprise, Google Analytics 4, Matomo Cloud, Adobe Analytics, AT Internet, Countly Enterprise, Mixpanel Enterprise, Amplitude Enterprise, Snowplow Enterprise, and Heap Premier.
The use cases presented above, however, demonstrate one thing – the products from our analytics suite integrate with one another in multiple configurations. You can choose the ones that best suit your needs and skip the rest.
What’s more, each tool can be hosted in a manner of your choosing – in a private cloud, at a third-party datacenter, or on your own servers. This lets you determine the level of data security you want to achieve. In addition, you can apply other security methods such as single sign-on and data encryption to further improve the safety of your data.
Sounds interesting? Then remember – if you’d like to learn more about our products, don’t hesitate to get in contact with us anytime. Our team will be happy to help!
The post 4 Sound Reasons to Choose Digital Marketing Platform (+Use Cases) appeared first on Piwik PRO.
]]>The post How cookie consent manager and tag manager work together for your GDPR compliance appeared first on Piwik PRO.
]]>To learn more about the most important changes introduced by GDPR, we encourage you to go through our informative blog post on that very topic:
How Will GDPR Affect Your Web Analytics Tracking?
In recent weeks, Google has introduced some product updates that aim to help their clients comply with the new law – for example, data retention control and a user deletion tool. However, it’s the client (data controller) who is responsible for collecting, managing, and storing consents (via opt-in) from visitors (for both Google Analytics and Google Tag Manager).
In addition, clients have to be sure they aren’t collecting any personally identifiable information (like emails, zip codes, names) because it’s against the Google Analytics Terms of Service (you did know this, right?). Following all these rules can be a big hassle for website owners.
If you want to dig deeper into the advantages of safe personal data processing (including first-party data), be sure to check out this blog post:
Why First-Party Data is the Most Valuable to Marketers.
Collecting user consents: a tricky business
Cookies seem to cause the most trouble. They’re mentioned in Recital 30 of GDPR, which states:
Natural persons may be associated with online identifiers provided by their devices, applications, tools and protocols, such as internet protocol addresses, cookie identifiers or other identifiers such as radio frequency identification tags.
This may leave traces which, in particular when combined with unique identifiers and other information received by the servers, may be used to create profiles of the natural persons and identify them.
This means that in order to remain compliant with the new laws, your website should now require your visitors to acknowledge and consent to the use of cookies before they start browsing your site.
If you want to deep-dive into the characteristics of proper GDPR consents and how they should be handled, we advise you to read this blog post:
How Consent Manager Can Help You Obtain GDPR-Compliant Consents From Your Users.
However, the list of your responsibilities doesn’t end there. Processing personal data (including cookies) involves many more obligations on the data controller’s side.
If you’re in this situation, here’s some of the things you must do:
- Develop a mechanism for collecting granular consents, tying them to specific users, and ensuring that the data will be used only for agreed purposes (for example, only for analytics purposes, but not for remarketing or data personalization activities).
- Gather all the consents (plus all the information we’ve discussed above) in one database which you can easily access and update on a regular basis.
- Prepare a mechanism for your users to change their mind, exercise their rights, and send you data subject requests.
Sounds like quite a challenge, right? These kinds of tasks take not only a lot of time, but also loads of human resources. Obviously, automating this process would make many lives easier.
Consent manager – just the job
Luckily, nature (or in this particular case – the market) abhors a vacuum. Many vendors have decided to take matters into their own hands and create a tool to mediate between visitors and analytics software. Depending on the provider, it’s called Cookie Consent Manager, Cookie Widget, GDPR Consent Manager, etc.
These tools are a kind of gatekeeper that passes information about consents between individual visitors and your analytics system. That way, you make sure that the data you’re operating on has been collected in a manner compliant with the new law.
An interesting comparison of these offerings can be found here: Tools & Widgets to Manage Cookie Consent.

The State of GDPR Consent
Overview and scoring of how websites have adapted to data privacy regulations
Tag manager – a perfect partner in not-crime
As mentioned in the article by Vicky Dallas we linked above, a good idea is to use the combined forces of Consent Manager and Tag Manager to handle user consents.
Tag management systems have proved themselves an extremely useful asset in the marketer’s arsenal. Now they can serve as a tool for reducing the burden of dealing with consents. Because these tools support a range of tag types, they make it a lot easier to ensure compliance of the analytical software and marketing tools placing tags on your website.
The connection of the cookie consent manager and the manager’s tag means that all information about your visitors’ preferences are quickly transferred to your analytics tool. From there it goes to other software using the data collected by your analytics instance – like Personalization or Customer Data Platform.
At least a couple of cookie consent manager providers have integrated their products with tag management systems. One of them is Piwik PRO. The GDPR Consent Manager we’ve developed works closely with a secure tag manager, providing more robust privacy of your data. For instance, you can store all your data in an on-premises environment, encrypt all the collected information, and use a chosen SSO method to log into your system for ensuring that only authorized employees can access the data.
How it works
All this might sound a bit abstract and hard to imagine. That’s why we’ve prepared some examples to show you how Consent Manager and Tag Manager work together. For your convenience, we have divided this process into steps you have to take in order to configure our tools for GDPR compliance:
1) Turning compliance on and off for each site
GDPR Consent Manager allows you to apply settings to every website that adjust the mechanism for firing tracking tags .
If you decide that GDPR compliance should be disabled on a particular website, then new visitors will be opted-in by default. But if you turn GDPR compliance on, new visitors will be opted-out by default and will receive a consent form pop-up (served by Tag Manager).
2) Choosing the types of tags that require visitor consent
Then you’ll have to decide which tracking tags don’t need consent and will be fired automatically for every visitor, and which of them will be fired after receiving consent.
Typically, the following categories of tags should be fired only after consent is received:
Analytics – web and mobile app analytics data tracking for basic information like IP address, device and browser information, etc.
A/B Testing and Personalization – tags for A/B tests via third-party vendors and personalized offers targeted at visitor segments.
Conversion Tracking – designed to track when and how visitors accomplish desired actions (purchases, downloads, form completions, etc.).
Marketing Automation – for audience segmentation in order to schedule and track marketing campaigns.
Remarketing – tags creating audiences for ads displayed to visitors after they leave your site.
User Feedback – information about user experience from visitor behavior and feedback.
Custom type – tags whose properties you can freely define.
However, every client can customize them based on their needs and compliance team’s suggestions. This information will tell Tag Manager which tags can be launched automatically and which require the user’s prior consent.
3) Creating consent pop-ups and widgets
Now it’s time to create the message you’ll show your visitors. With a little help from a user-friendly editor, you can design messages that will be shown to people visiting your website for the first time, as well as those who have already been there but haven’t made a decision about consent.
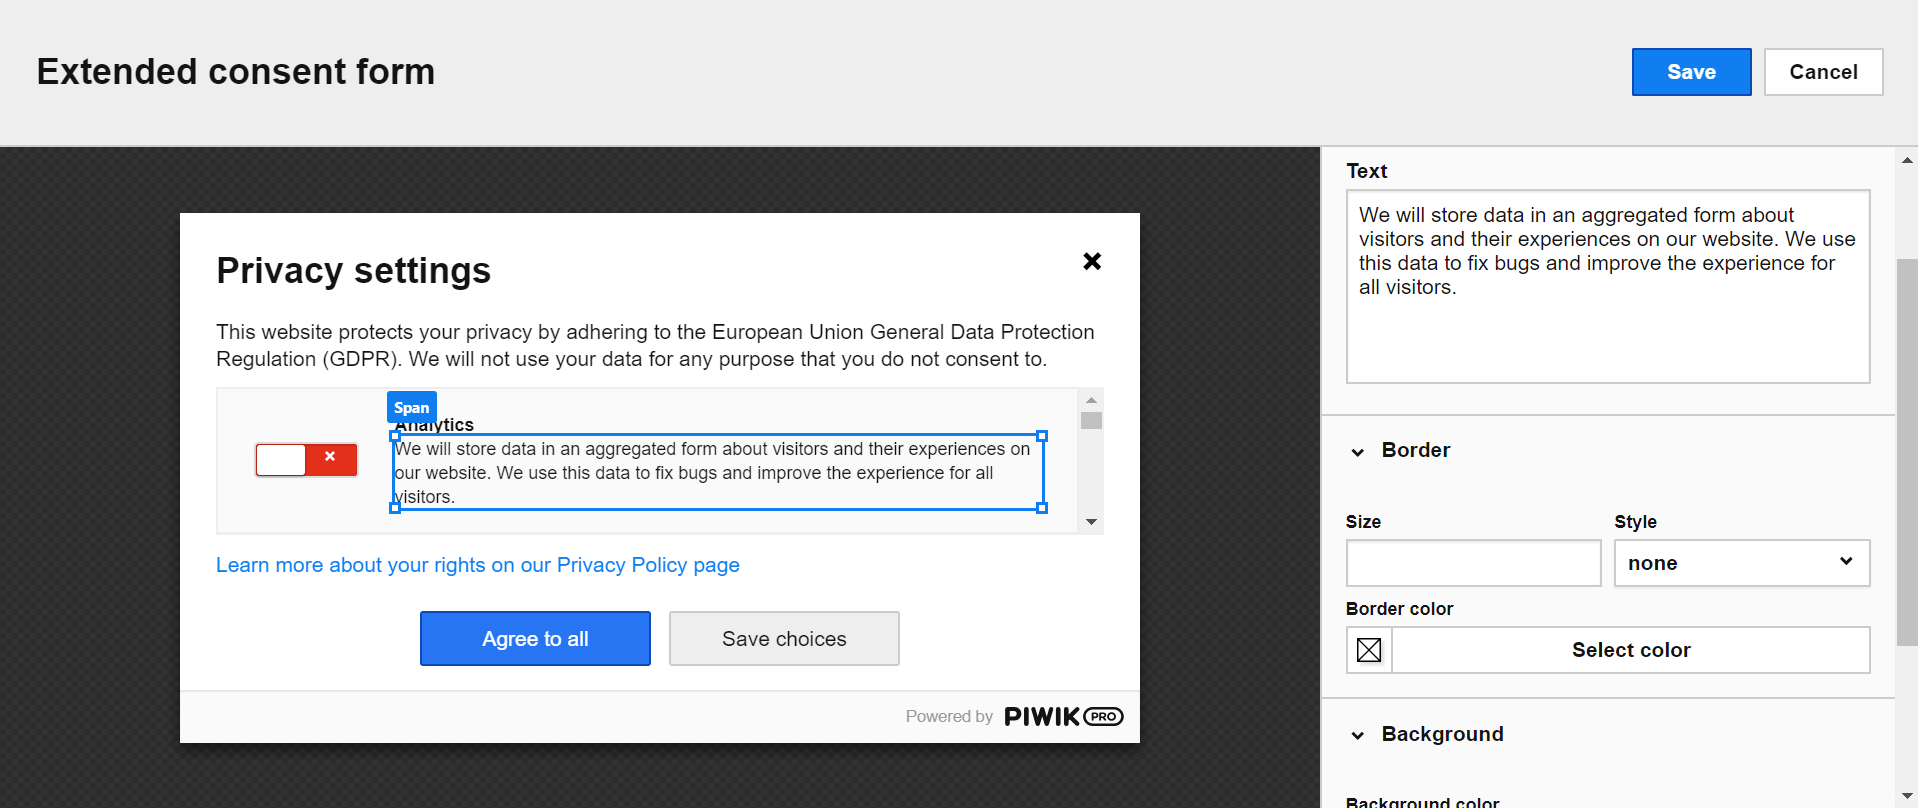
4) Displaying the pop-ups to your visitors
Once you’ve created all the dialog forms, it’s time to approve the messages and make them visible to all. Pop-ups and widgets give both first-time visitors and returning visitors who haven’t responded to your request the chance to make a decision.
Information about their choices is then saved by Tag Manager in a single first-party cookie and in the Cookie Consent Manager database accessible from your admin panel. All consent decisions will be kept there for one year.
The State of GDPR Consent
Overview and scoring of how websites have adapted to data privacy regulations
Summary
We hope that we’ve convinced you that Consent Manager is the right tool for dealing with GDPR consents from your visitors. And it will be extremely useful if the tool works smoothly with Tag Manager.
If you would like to learn more about collecting consents in accordance with GDPR, we invite you to follow our blog. And remember – you can always contact our team, we’re happy to share our knowledge with you!
The post How cookie consent manager and tag manager work together for your GDPR compliance appeared first on Piwik PRO.
]]>The post How Your Web Analytics Can Team Up With a Tag Manager for Better Insights appeared first on Piwik PRO.
]]>On the other hand, tag management systems can effectively put digital marketers back in control of digital marketing data. Web analytics can become simpler and more efficient, as most actions which required access to your website’s code can now be performed with minimal technical expertise, without the IT’s team help.
So it’s no wonder that Josh West of Analytics Demystified highlights the usefulness of tag management solutions for web analytics saying: The truly great part of tag management is how it has “democratized” digital marketing.
In what way, you might ask? It’s really simple: Tag management tools have broken down the walls not only between IT and marketing, but also between individual teams within marketing as well […].
Still, you might not be convinced. “Taking back control”, “democratizing digital marketing” – it all sounds a bit vague. And I couldn’t agree more.
It’s one thing to theorize about the advantages of pairing web analytics with tag manager, but showing concrete examples is something completely different. So, why waste your time on introductions – let’s get right into it!
Here are two big reasons showing you in detail how to use a tag manager with web analytics and how to benefit from their cooperation.
Free Comparison of 6 Enterprise-Ready Tag Management Systems
Get to know the 40 key differences between Google Tag Manager, Tealium, Segment, Adobe Marketing Cloud, Ensighten & Piwik PRO:
Are my articles engaging enough? Tracking Events with a Tag Manager
Let’s start with a simple example of finding out whether your content is engaging enough to convince your visitors to check out your social media channels. This is a question often asked by marketers, but it’s really hard to properly measure.
It’s one thing if you know, that your article/blog post went viral, but to see if people are visiting your social media pages, learning which social media channel is the most popular, learning where you should promote your content – that’s a whole other question. Thankfully the duo of a Tag Manager and Web Analytics can handle this challenge.
So, you’d like to measure the level of visitors engagement and focus only on your blog (or any site, where you publish your articles, but for the sake of this example, let’s say – blog). Is there any link between the popularity of your blog posts, and new visits, likes and followers on your social media channels? Maybe a certain blog post really motivated your visitors to check out your social media channels and you should write more articles like that? Or maybe there is no connection between the two, and all your efforts were fruitless?
These are all interesting questions. And with the help of Piwik PRO Event Tracking you might be able to get all the data you need to answer them. But Piwik PRO Tag Manager makes reaching that data and answering those questions easy as pie (or a walk in the park if you prefer a healthy lifestyle).
What to do?
First things first – you have to have your web analytics tracking code implemented, and integrated with your Tag Manager. But I think we both know this was obvious.
So the first “real” thing you have to do is to specify what you really want to measure. “Engagement” is a big word, and it can mean a lot of things. Specify your needs. You want to learn how many visitors choose to visit your Facebook page after reading an article on your blog. So you want to focus only on clicks from your blog (from every blog post on your website), even though you have your social media buttons on almost every page on your domain.
Great, now we know what we’re dealing with and we can easily create a tag to track exactly this. In order to create is we can use this simple template:_paq.push(['trackEvent', 'Event Category', 'Event Action', 'Event Name’, Numeric Value]);
This function has four variables: event category, event action, event name and numeric value. Of those four variables the last two are optional, so remember – you don’t have to specify them (and we won’t do it in our example). If you want to learn more about Event Tracking, be sure to check out this Ultimate Guide.
Remember: a Piwik PRO event needs to be wrapped up in the <script> tags in order to work properly. So our Piwik PRO event code snippet will look like this:_paq.push(['trackEvent', 'Click', 'SITE URL']);
Now, once we customized our template, we can go on and continue with Tag Manager. Click on the Add a Tag, then name it, so it it will be easy to find later (If you want to edit it, re-use it, or delete it).
Choose asynchronous custom HTML tag, and insert the snippet from before.
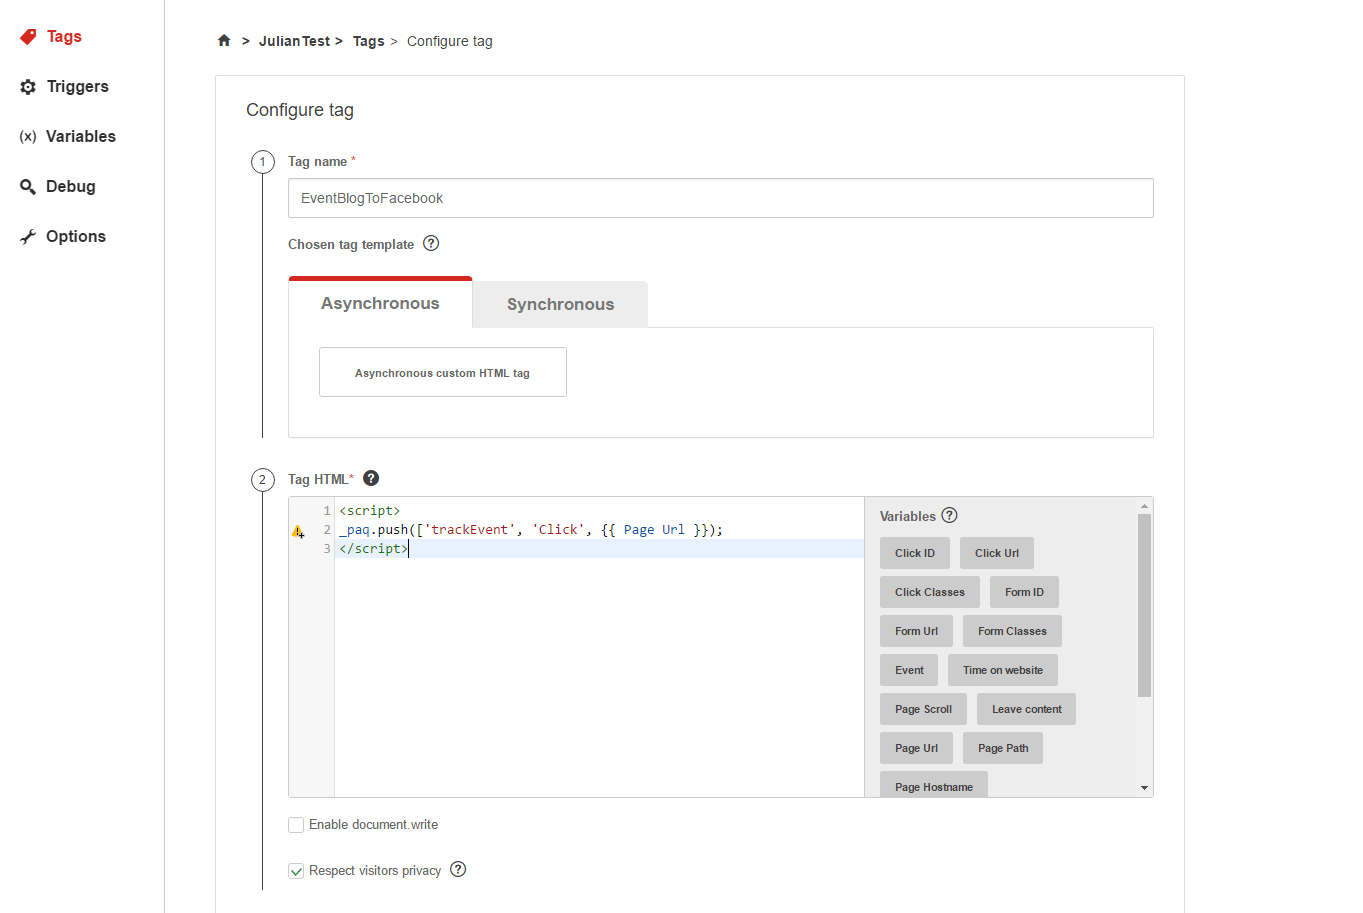
In the place of “Site URL” choose the variable from the list on your right. For our example, we want to group reports by the different page urls, so choose that one (Page Url).
So now that we have our event, all we have to do is specify when should it work. It’s about time to add triggers. Create a new trigger, add a name to it (so you can use it when creating different tags) and specify it. The event should load on Click, and there should be some conditions. The event should only be counted on your blog, so set the click url as “contains” and add the part of the url, which applies only to your blog post. Let’s say it looks like this: www.example.com/blog/.
We configured the url in this way assuming that each and every blog post starts with the same URL: www.example.com/blog/. But, this will not always be the case, so be sure to specify the conditions correctly in order to get proper results.
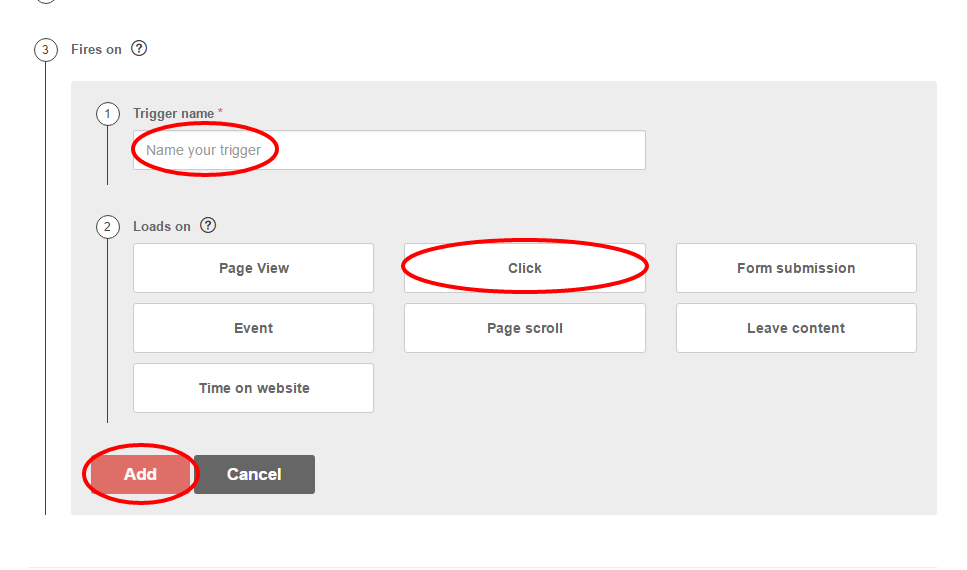
The tag should fire only when visitors click on the Facebook button. It’s good to check your website’s code, because to do this, we must use DOM elements (pieces of HTML and CSS source code describing the button) found in the source code of the page.
You can find out this information easily by “inspecting” the page. In Chrome all you have to do is right click on the button and choose inspect element. This is what we should see:
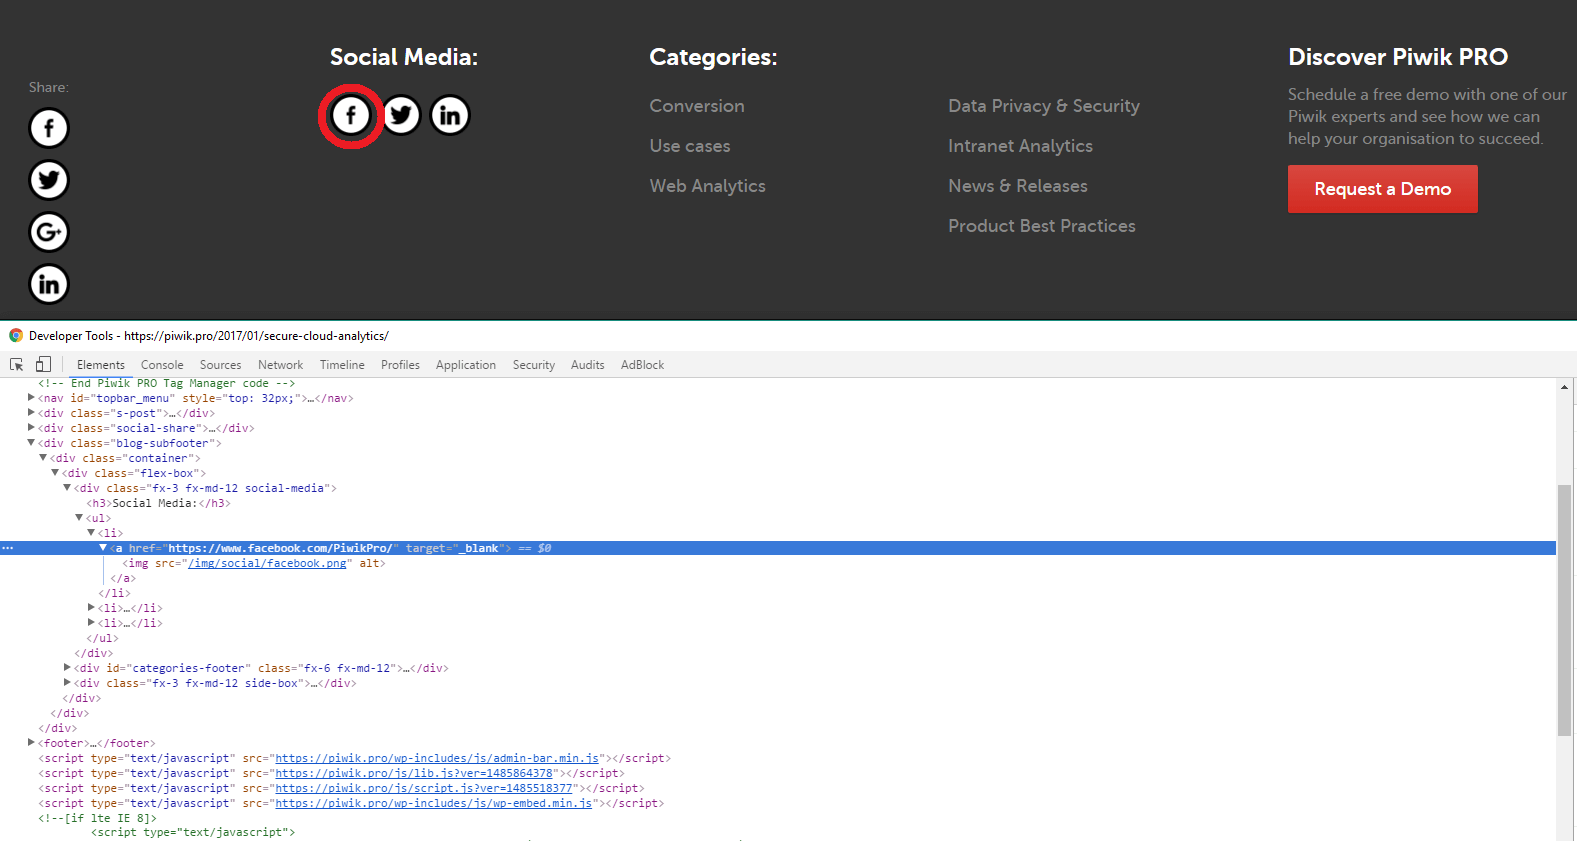
In this case there is no CLASS, just the URL. So we copy the specific URL in the second condition specifying it like that: click url contains and here we insert the url
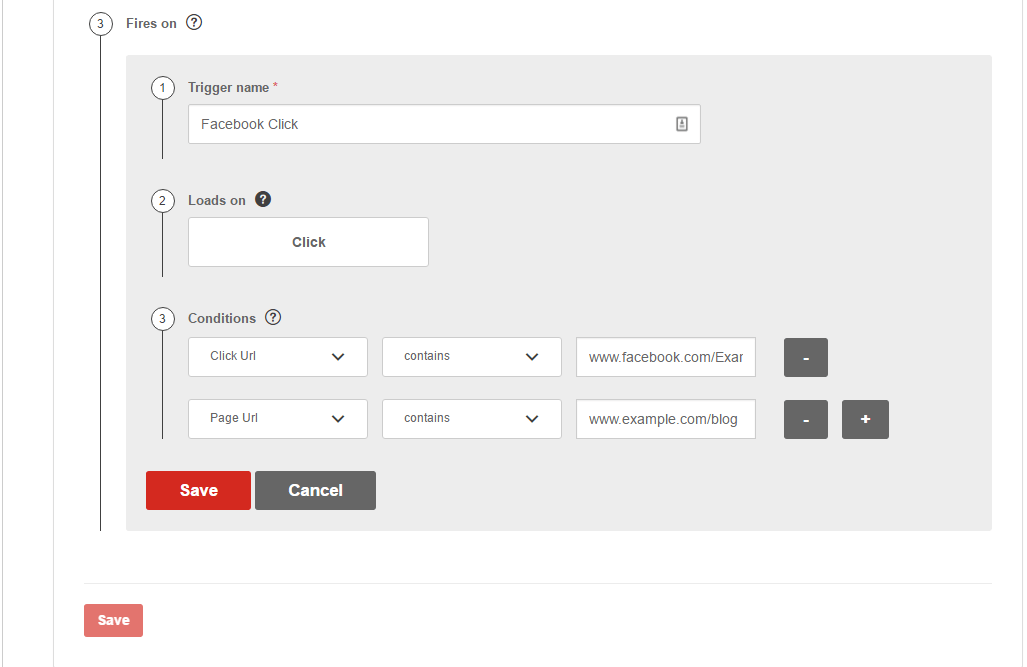
There are three more clicks ahead of you. Save the trigger, save the tag and finally click Publish at the top of the page.
And there you have it. Now in Piwik PRO your report will display information about all clicks on the Facebook button from your blog posts and you’ll be able to see which blog post generated the highest number of clicks. What’s more, you’ll be able to check the visitor log and analyze how your visitors behave before clicking on the Facebook button.
But that’s not all, as the reports will allow you to measure growth in your visitors’ engagement levels by choosing the insights option, which lets you compare the chosen time period to a previous one and filter the results to focus only on improving or declining metrics. You can also easily compare the results of each blog post using Piwik PRO Comparison Dashboard. Learn more about this useful feature from our user guide.
That’s a lot of important insights gathered quickly and without having to beg your development team for help.
How can I optimize my campaigns? A/B Testing with Tag Manager
Let’s move on to the next use case. Here, we will see more advantages of integrating a tag manager with other web analytics tools or optimization software.
Let’s go ahead and think about the experiments we run constantly on our web pages. You might think of yourself as the high and mighty, know-everything kind of guy who knows exactly how to structure a sentence so every user who reads it will be instantly mesmerized and will click the CTA on your landing page. But, just for the moment, let’s imagine that there is a slight chance that you might be wrong! So maybe – just maybe – you might want to create an experiment!
Yes!
First we create a A/B testing scenario, and then configure our whole campaign in Optimizely. To do this you have to start New Experiment, insert Experiment Name, set the Experiment URL and Create Experiment. Then you have to configure what the variation will look like.

I will not go into further detail, as we have a great guide on how to launch A/B tests using Piwik PRO and Optimizely. So check it out, and let’s continue from the moment, you finished creating the experiment.
What should I do after creating the experiment in Optimizely?
We arrive at the point where a Tag Manager can once again show you its usefulness. As you know, there is an Optimizely Integration in Piwik PRO. But, without the help of Piwik PRO Tag Manager you’d have to edit your website’s source code to put the Optimizely snippet into the head section. You’d have to contact the development team again and again and you would no longer be in control of the process.
.
But thanks to one of the many useful features of Piwik PRO Tag Manager, you can easily add Optimizely code to your website. This feature is the ability to add synchronous tags.
*Of course, we are assuming that the Piwik PRO Tag Manager code has been implemented earlier – we need IT assistance only once at the beginning.
It is really easy to configure Optimizely in Piwik PRO Tag Manager. All you need is to do is first: create a new tag (just like in the examples before), by clicking add a tag button. Then (again) remember to create a proper name for the tag, so you’ll be able to find it anytime. And now, finally, something new – choose the synchronous option and click on Optimizely.
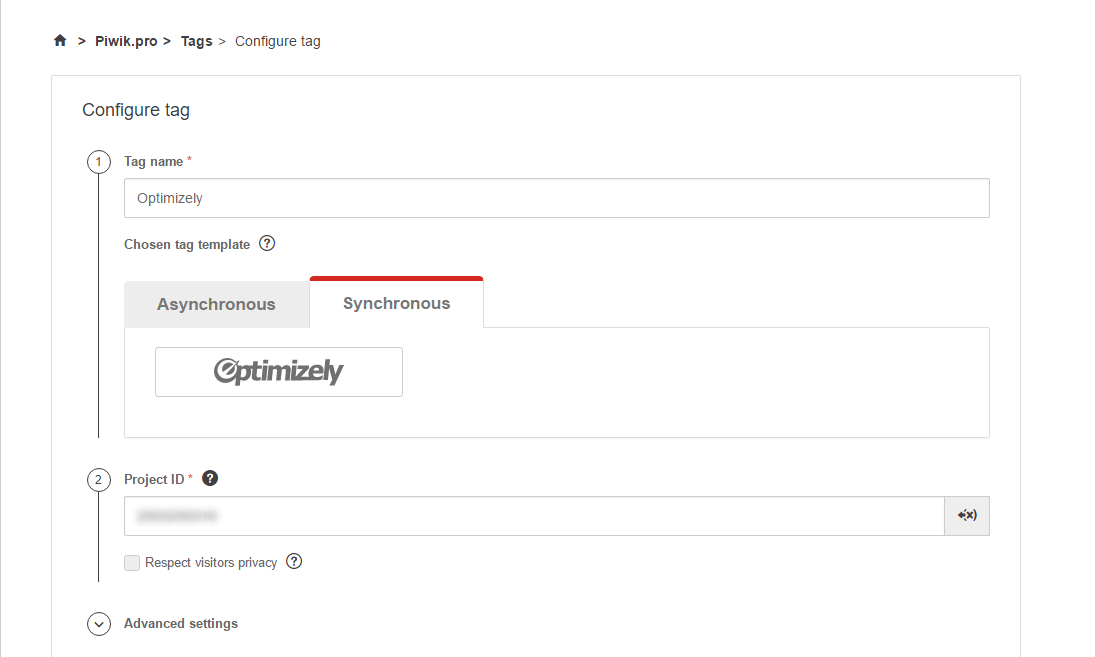
Now find the Project ID number you got earlier when creating the experiment. If you’re having some troubles with that, you can find this number on your Optimizely account page, in the settings options, under the snippets details.
Once all of that is done, we can focus on the important part – when the tag should be fired, when should it work. In our example, we want it to fire on every page, where the optimizely project ID is, so all we have to do is to create a trigger, name it properly, and specify it to Fire tag on all pages. Then we click save and publish.
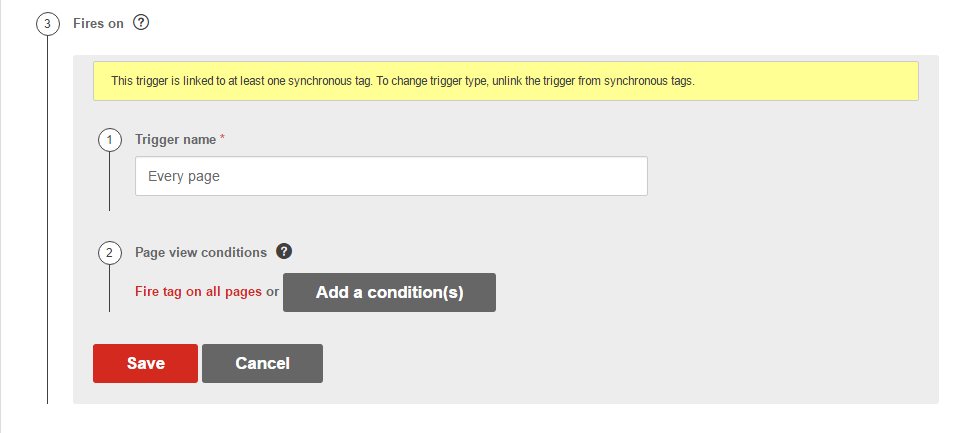
Important! You might encounter such a notification:

It reminds you, that for the synchronous tag to work, first there needs to be a working asynchronous tag published on those same web pages.
And there you have it. Simple isn’t it?
It’s easy to notice the advantages of using tag manager with Optimizely, but let’s recap them (in case you missed it):
- hassle free integration and deployment of optimizely synchronous code,
- more flexibility when it comes to optimizely customization and a/b tracker management.
And this is just one, fairly simple example.
Don’t Be Afraid of Combining Your Tools
As you can clearly see, pairing a tag management system with web analytic tools is not just a good, revolutionary idea. Today it’s a decision you should’ve already made at least a year ago.
Regaining control over your analytic endeavours, saving time and energy so you don’t have to constantly be at the mercy of IT teams, implementing your campaigns easily, with minimum technical expertise. This all means that adding a tag manager to your digital arsenal will make your work more efficient, while at the same time letting you access even more adequate and precise data. If you still have doubts, don’t hesitate and contact us.
Free Comparison of 6 Enterprise-Ready Tag Management Systems
Get to know the 40 key differences between Google Tag Manager, Tealium, Segment, Adobe Marketing Cloud, Ensighten & Piwik PRO:
The post How Your Web Analytics Can Team Up With a Tag Manager for Better Insights appeared first on Piwik PRO.
]]>The post Tag Management and a DMP: A Perfect Match appeared first on Piwik PRO.
]]>If it doesn’t, it should.
Why?
Because a DMP needs data like a car needs fuel. Otherwise it’s not very useful at all.
DMP users are anxious to get their hands on as much information about what visitors do on a website as possible – whether it be about conversions of different kinds, product views, button clicks, added or removed items from a shopping cart or the activation of different services within an online account.
This is what is known as first-party (or owned data) and for marketers and advertisers it is the most likely to produce results when used in conjunction with the data segmentation and activation capabilities of a DMP.
Digital marketers and data analysts use tags to collect this information.
It is then passed along to the DMP which can use it for targeted media-buying, content personalization or a host of other uses.
With all the different actions to track, the number of tags ends up being pretty large. A tool like a tag manager helps its users manage all of these tags – lest some useful data “slip through the cracks.”
But that’s not all.
An integrated tag management system (TMS) can serve as a central data hub for the first-party data it collects. Besides feeding a DMP, this data may need to be passed on to other marketing tools (for optimization or email automation).
Free Comparison of 6 Enterprise-Ready Tag Management Systems
Get to know the 40 key differences between Google Tag Manager, Tealium, Segment, Adobe Marketing Cloud, Ensighten & Piwik PRO:
But in some cases, this data usage may be subject to data privacy regulations – which is why a tag management system can help make sure that only the correct type of data is shared and only with a web visitor’s consent.
For all of these reasons a tag manager is an extremely valuable part of any data management stack.
How Does a Tag Manager Work?
As mentioned already, tag manager gives marketers, data analysts and advertisers a centralized tool where they can easily view, change and deploy tags.
Instead of manually inserting tags – snippets of Javascript code – into the source code of their website, they can configure them in one central interface.
This makes it easy to add new ones and delete old ones – as well as verify which ones are currently live and which ones are not.
Not only does a tag manager giving its users a central place to control tags and the flow of the data they collect, it also works by placing all the tags into one “container” which is loaded in the section of a web page. So they are not fired in-line with each element (hence the name “asynchronous”) and greatly improves page loading times, especially when there are large numbers of tags to be loaded.
Additionally, a tag manager helps quickly configure tags to collect the information needed.
This means:
- Built-in templates for popular analytics, conversion and remarketing tags (Google Analytics, Piwik PRO, Crazy Egg, Optimizely, Facebook pixels, etc.)
- Triggers and conditions to determine when tags are fired (e.g. on form submissions, after certom page elements are clicked or only for visitors from certain traffic sources)
- Built-in or custom variables (for capturing certain information from the website and passing it to other tools and setting up advanced conditions)
Finally, a good tag manager will also allow its users to test and debug tags before they go live.
All of this makes a tag manager a powerful tool for gathering the very specific information that a DMP needs to do its job.
Some examples of useful data that can be collected for use in a DMP are:
Events
- Product pageviews (to serve personalized promotions/ads to returning visitors on an ecommerce website)
- Button clicks (showing interest in particular content or engagement with ads on 3rd-party sites)
- Form field completions (to determine where visitors left the funnel enroute to a conversion)
Conversions
- Thank you page views (after a whitepaper download or successful sign-up)
- Ecommerce purchases
- Display ad clickthroughs
In some instances (during A/B testing, for instance), loading tags synchronously may be necessary to prevent page elements from flashing momentarily (a.k.a. Flash of Original Content).
As mentioned already, the more information a DMP has at its disposal, the easier it is to create insightful audience segments. And the more data that needs to be gathered using tags, the more a tag manager becomes a must-have.
Why Collecting 1st-Party Data is Key
More and more marketers are beginning to see the advantage of activating their 1st-party data (as opposed to targeting customers with 3rd-party data segments bought from data vendors).
With a tag manager incorporated into a data management stack, marketers have direct access (and control) over the collection process for their valuable first-party data.
In particular, a DMP that uses 1st-party data collected with the help of a tag manager can:
- Fuel content personalization based a visitor’s previous behaviour on the company’s site
- Help create highly relevant “live” audience segments for media-buying and selling
- Guarantee data privacy compliance by helping control what data is passed to what tags and what marketing tools
This final point is especially important and helps explain the increased emphasis on 1st-party data.
Because new data privacy regulations will stipulate that internet users be given the explicit option to opt out of tracking, DMP users need a way to control which data they are using and provide their subjects with a way to indicate they don’t want to be tracked – right from the very beginning.
By having a tag management system fully integrated with the DMP, it is possible to make every tag privacy compliant and thus protect the DMP user from any possible problems by using data that has been collected improperly.
Tag management and a DMP – a powerful duo
The measure of a DMP’s effectiveness is ultimately its ability to take large amounts of data and break it down into actionable pieces for advertisers, marketers and publishers.
As the speed of the digital landscape accelerates, the need to stay agile and adapt campaigns quickly to changing business needs and market trends is paramount.
Using a tag manager can significantly streamline the data collection process and give DMP users the power to decide which data to gather as they need it and control its usage throughout the entire process.
Free Comparison of 6 Enterprise-Ready Tag Management Systems
Get to know the 40 key differences between Google Tag Manager, Tealium, Segment, Adobe Marketing Cloud, Ensighten & Piwik PRO:
The post Tag Management and a DMP: A Perfect Match appeared first on Piwik PRO.
]]>The post What are the benefits of using a Tag Manager? appeared first on Piwik PRO.
]]>Why? To grasp the tangible benefits that a tag manger provides to marketers, we must first understand what a tag manager is and what it does.
Tags: The Bread & Butter of Digital Marketing
Tags and tracking pixels (small snippets of code, usually JavaScript) are everywhere on the internet, and with good reason — they are extremely useful.

Tags can tell you, for example:
- when someone views a page.
- if a visitor arrives on a site or landing page after clicking on a Google AdWords ad.
- how often visitors liked or shared content from your site via Facebook or Twitter.
- which items a visitor viewed or purchased on your site.
The examples above show how tags can be useful for analytics as well as conversion-tracking purposes, but that’s not all.
Tags have many other functions as well.
- Advertising: Ad tags help facilitate digital ad placement by communicating between publisher websites, ad servers, and other platforms.
- Retargeting: Retargeting tags help keep track of your website’s visitors in order to later target them with ads on other sites they visit.
- A/B testing: Tags allow you to easily collect data about users’ behavior as you optimize your website, landing pages, or email campaigns.
- Other website functionalities: Using tags, it is possible to get more insights into user engagement with feedback and survey forms, including form abandonment. They can also facilitate live chat services by reporting user behavior leading to proactive chat opportunities.
Free Comparison of 6 Enterprise-Ready Tag Management Systems
Get to know the 40 key differences between Google Tag Manager, Tealium, Segment, Adobe Marketing Cloud, Ensighten & Piwik PRO:
Who needs tags? Anyone who needs data about online activity and wants to enhance or add extra functionality to their website, and, as the examples above show, digital marketers in particular. But here’s the problem:
Creating and managing these tags is a technical process that requires inserting code snippets into a web page and setting them up to report to an analytics tool like Piwik PRO or Google Analytics. Of course, not every marketer is also a programmer. This puts tags and tag management at the intersection of two relatively different fields — marketing and IT.
Management Made Easier
This is where a tag manager comes in.
It serves as a tool for marketers with little or no technical knowledge, allowing them to easily work with tags in order to gather the data they need.
How does a tag manager work?
First and foremost, a tag manager serves as a dashboard for creating, editing, and managing tags on any number of pages. This “all-in-one-place” aspect is particularly important as businesses grow and they need to deploy more and more tags across their website.
With a tag manager, creating and implementing tags is a matter of just a few clicks, and marketers are able to easily test and fix tags to make sure they are working properly so they don’t miss out on valuable insights about potential customers.

From a technical standpoint, a tag manager does many things:
- All the tags to be fired on a web page are placed in a container tag. This replaces manual tag insertion into the source code of the website and speeds up the process of tag management.
- A tag manager allows its users to easily select the triggers or actions (viewing a page, clicking on a link, etc.) that will cause a tag to fire or report to the analytics platform it is linked to.
- Tags can also be set with variables in order to collect more specific information — e.g. if there was an e-commerce purchase of over $100.
- For tracking standard activity such as AdWords conversion or social sharing, there are templates to make tag creation even quicker.
- Perhaps most importantly, a tag manager allows its users to test and debug the code of a tag before it goes live — a big step towards avoiding headaches down the road.
All this (and more) makes a tag manager an extremely useful tool. No wonder it has the power to make a lot of people happy!
People Who Benefit From a Tag Manager
Tag managers are extremely useful tools that have the ability to meet the expectations and needs of a wide variety of people, including:
Customers
Yes, the customer is always most important.
And believe it or not, customers are some of the first to benefit when you start using a tag-management system.
There are a couple reasons for this.
One, being able to keep better track of tags, including third-party tags, means it’s easy to remove those which are no longer necessary or may be gathering unauthorized data about your users, leading to data leakage. Your customers will be glad for that, especially if your business or organization handles sensitive financial or healthcare data.
Second, without a tag manager, your site may have performance problems. The more tags you use, the more code each page contains. Each tag that has to load and execute separately slows down the overall page-loading time — not the kind of thing that contributes to a positive customer experience.
In fact, statistics have shown a full 40% of internet users are likely to abandon a site if it takes longer than three seconds to load. Add that to the fact that over 60% of online shoppers won’t return to a site if their first experience is bad, and it’s easy to see why it’s important to keep your tags under control.
A tag-management system addresses this problem quite well. Thanks to container tags, pages can load much quicker because there are fewer requests being sent. Also because the code controlling all the tags on a page loads asynchronously, it does not impede the loading of other elements.
Your IT team
As mentioned above, tags are basically JavaScript code with a specific marketing function. Without a tag manager, the burden of placing these tags where they need to be falls on the members of your in-house IT team, so every time a tag needs to be added or changed because of a new marketing campaign or updated landing page, a programmer or webmaster has to be involved, creating more work and ultimately slowing down the overall process of data gathering.
It goes without saying this can lead to headaches, miscommunication, and tension, especially when IT has a lot more complicated tasks on its plate.
Implementing a tag-management system streamlines the process considerably, and even if IT has to be involved from time to time, the built-in features of a tag manager like templates, pre-set variables and previews (to check for bugs before firing) make their job a whole lot easier.
Marketing & Sales Managers
While the day-to-day use of a tag-management system may not be their domain, both sales and marketing managers will be delighted with the improvements it brings.
For one thing, a robust tag manager is designed to integrate smoothly with data analytics and data-management platforms (DMP), making it easier to quickly segment audiences for more targeted campaigns, track conversions, and better analyze marketing ROI.
The ability to quickly update and add tags also makes marketing and sales processes much more agile.
Having up-to-date data on user behavior means it is possible to react quickly to trends, implement promotions, and quickly target customers who are likely to convert, all without waiting for IT support or worrying about broken code that may skew or leave out vital information.
For these and many more reasons, tag-management systems are becoming a staple tool of the modern marketer.
This article was originally featured on Website Magazine. Check it out here.
Free Comparison of 6 Enterprise-Ready Tag Management Systems
Get to know the 40 key differences between Google Tag Manager, Tealium, Segment, Adobe Marketing Cloud, Ensighten & Piwik PRO:
The post What are the benefits of using a Tag Manager? appeared first on Piwik PRO.
]]>